Setting up G-Suite, AWS SSO and ssosync
Published May 27, 2020
Reading time 17 minutes
update-July 28th
The ssosync tool has had a lot of interest and the community has updated the tool. This means that you should refer to the project home page https://github.com/awslabs/ssosync and check out the README.md for what changes you might need to make to get this tool working.
Enabling AWS SSO with Google G-Suite
Many customers have existing directory technologies where they manage their users, and then use this central identity store as a way to simplify the way they authenticate and provide access to applications and other resources. Those directories might be something like Microsoft’s Active Directory or Google’s G-Suite. For example, I have a G-Suite setup for the lovely people in my house as we collaborate using the various tools it provides. We each have our own account (person@mydomain) which is managed by the G-Suite Admin function.
AWS Single Sign On is an AWS service that launched a few years ago that allows you to authenticate AWS resources using the same identities you use to log into your Microsoft or Google accounts, making it easier for those authorised resources to access AWS accounts using the same set of credentials. This is the wonder that is federated identity, and AWS Single Sign On allows you to leverage that to authenticate those users into the AWS and access resources you define.
I just spent a couple of hours setting this up, so wanted to walk through this as it might help others who are trying to do the same. I wanted a way to authenticate into the AWS console using G-suite credentials rather than having to setup new users in the AWS console. A lot of the guides out there are pre AWS SSO, so wanted to put together this guide that I used to get this all working.
A quick word about browsers, privacy mode and testing - one of the challenges when testing this is to make sure you have a ‘clean’ browser environment as you login and log out of using various identities. I use a combination of different browsers as well as incognito/privacy modes to help. You might need to do something similar, or use the approach that you are familiar with.
What you will need and be aware of
- Administrator access to your AWS account and G-Suite accounts. I struggled to find the G-Suite admin console link, but this one worked for me: https://admin.google.com/u/1/ac/home
For the purpose of this post, I had to setup some test users and groups in my G-Suite environment. You may not need to do that.
- You will need to setup AWS Organisations. If you do not have this setup, don’t worry this will walk you through the step. If you already have this setup, then nothing to see, walk on by.
What if I already have SSO set up?
Excellent question. You can only set up a single Identity provider, so you will need to review your current setup before proceeding as you will need to delete any existing SSO configurations before setting up this one.
Do NOT proceed until you know what you want to do. Deleting an existing configuration may break stuff, so find out more about that before continuing!
What if I have a big G-Suite directory with LOTS of users OR I have 100’s of AWS Accounts
You do need to be aware of the limits when using AWS SSO and integrating your G-Suite directory, so check out the current limits page here.
If this is a blocker for you please let me know, we are always working hard to make sure that customer feedback drives how we make our services better.
With that out of the way, let’s begin.
Setup your G-Suite users
The first thing you need to do is add some additional attributes to the users in the G-Suite directory as these attributes are needed to make SSO work.
1] From your G-Suite Admin go to USERS
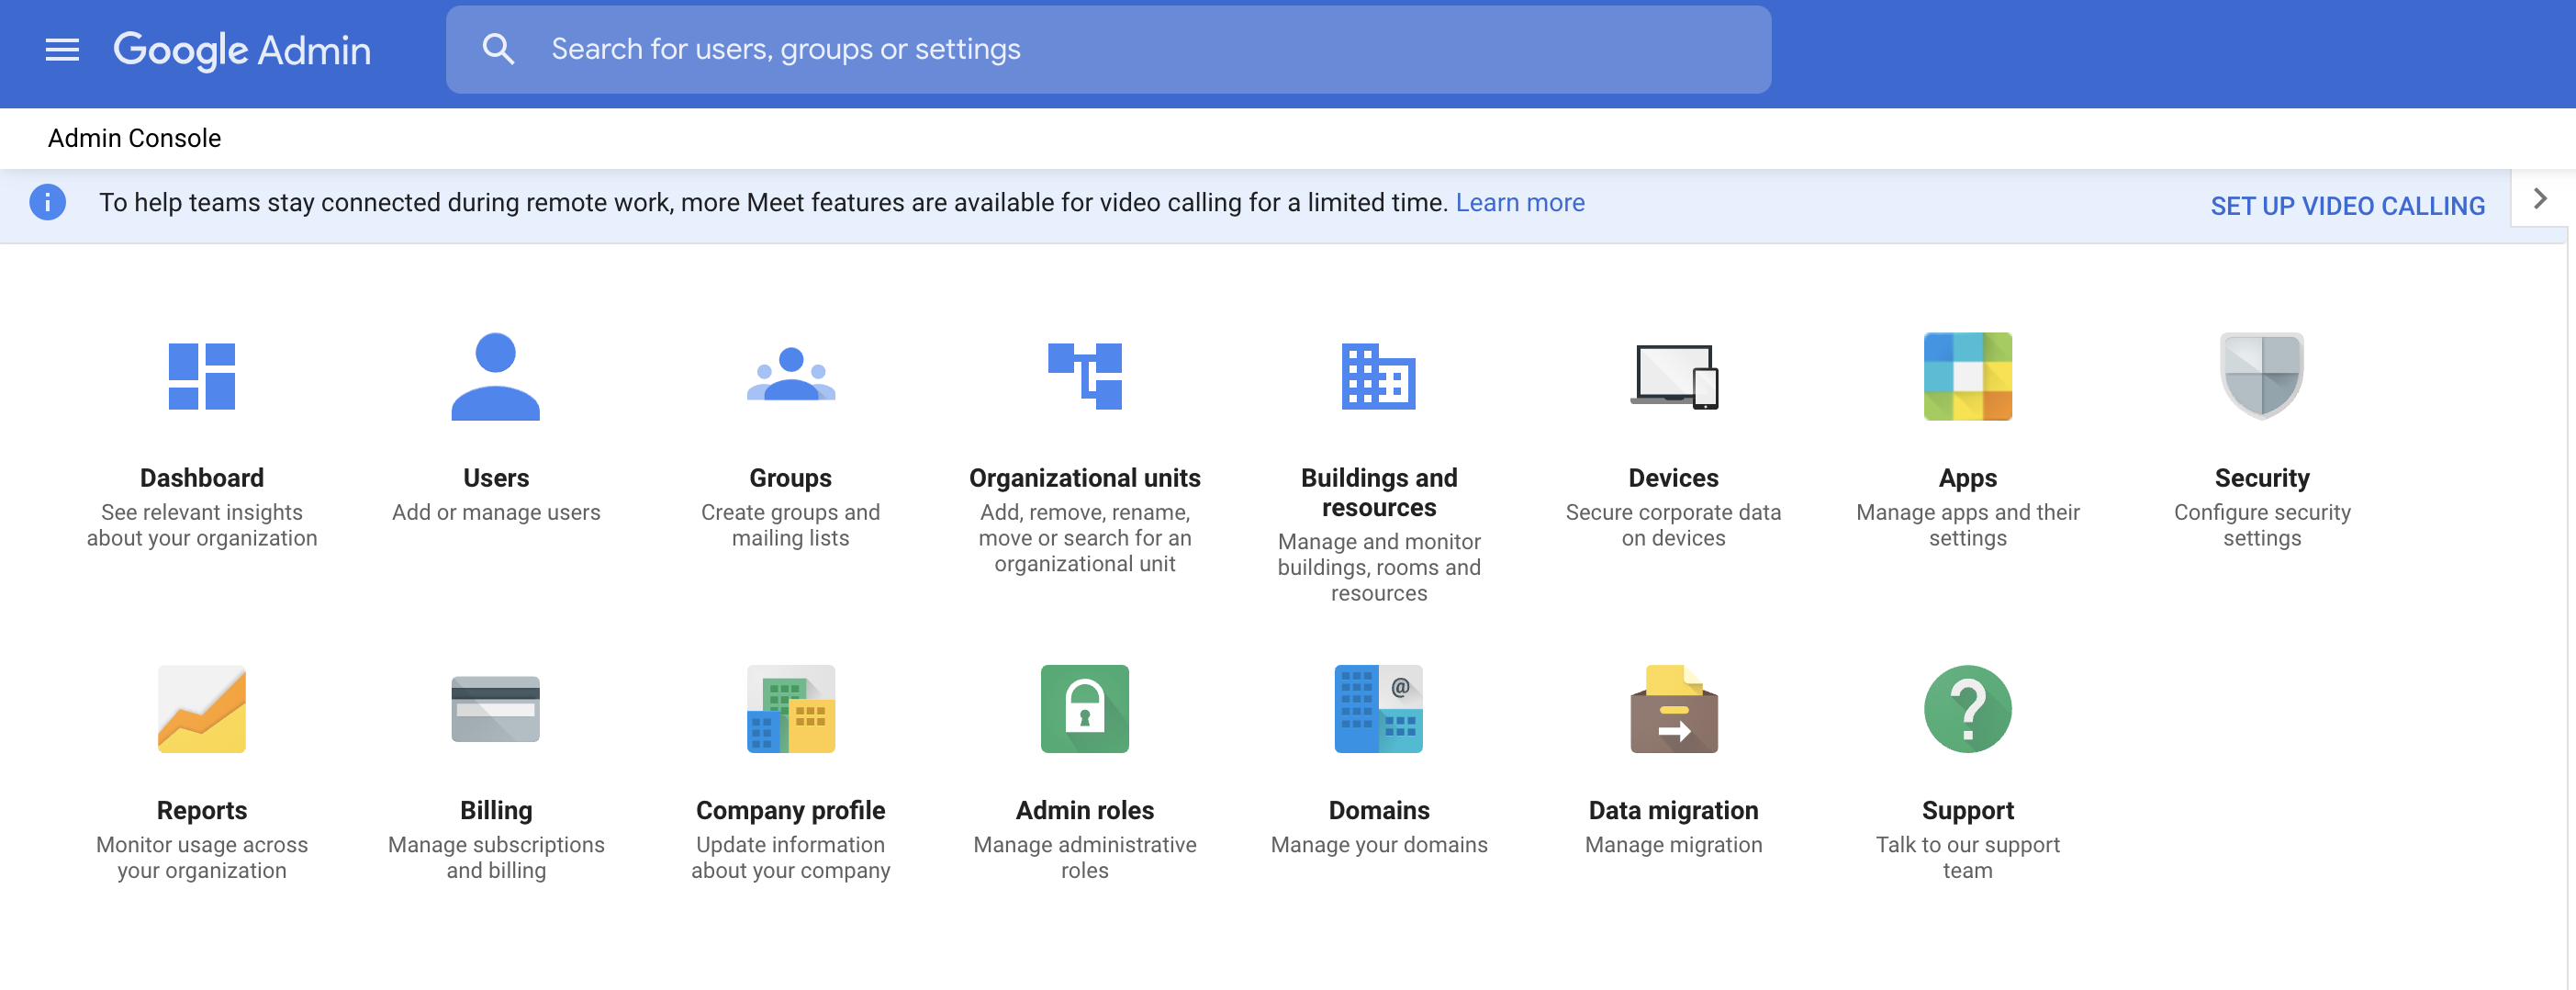
2] From this screen, select MANAGE CUSTOM ATTRIBUTES (on the current UI, this is under the MORE menu option)
3] Click on ADD CUSTOM ATTRIBUTE
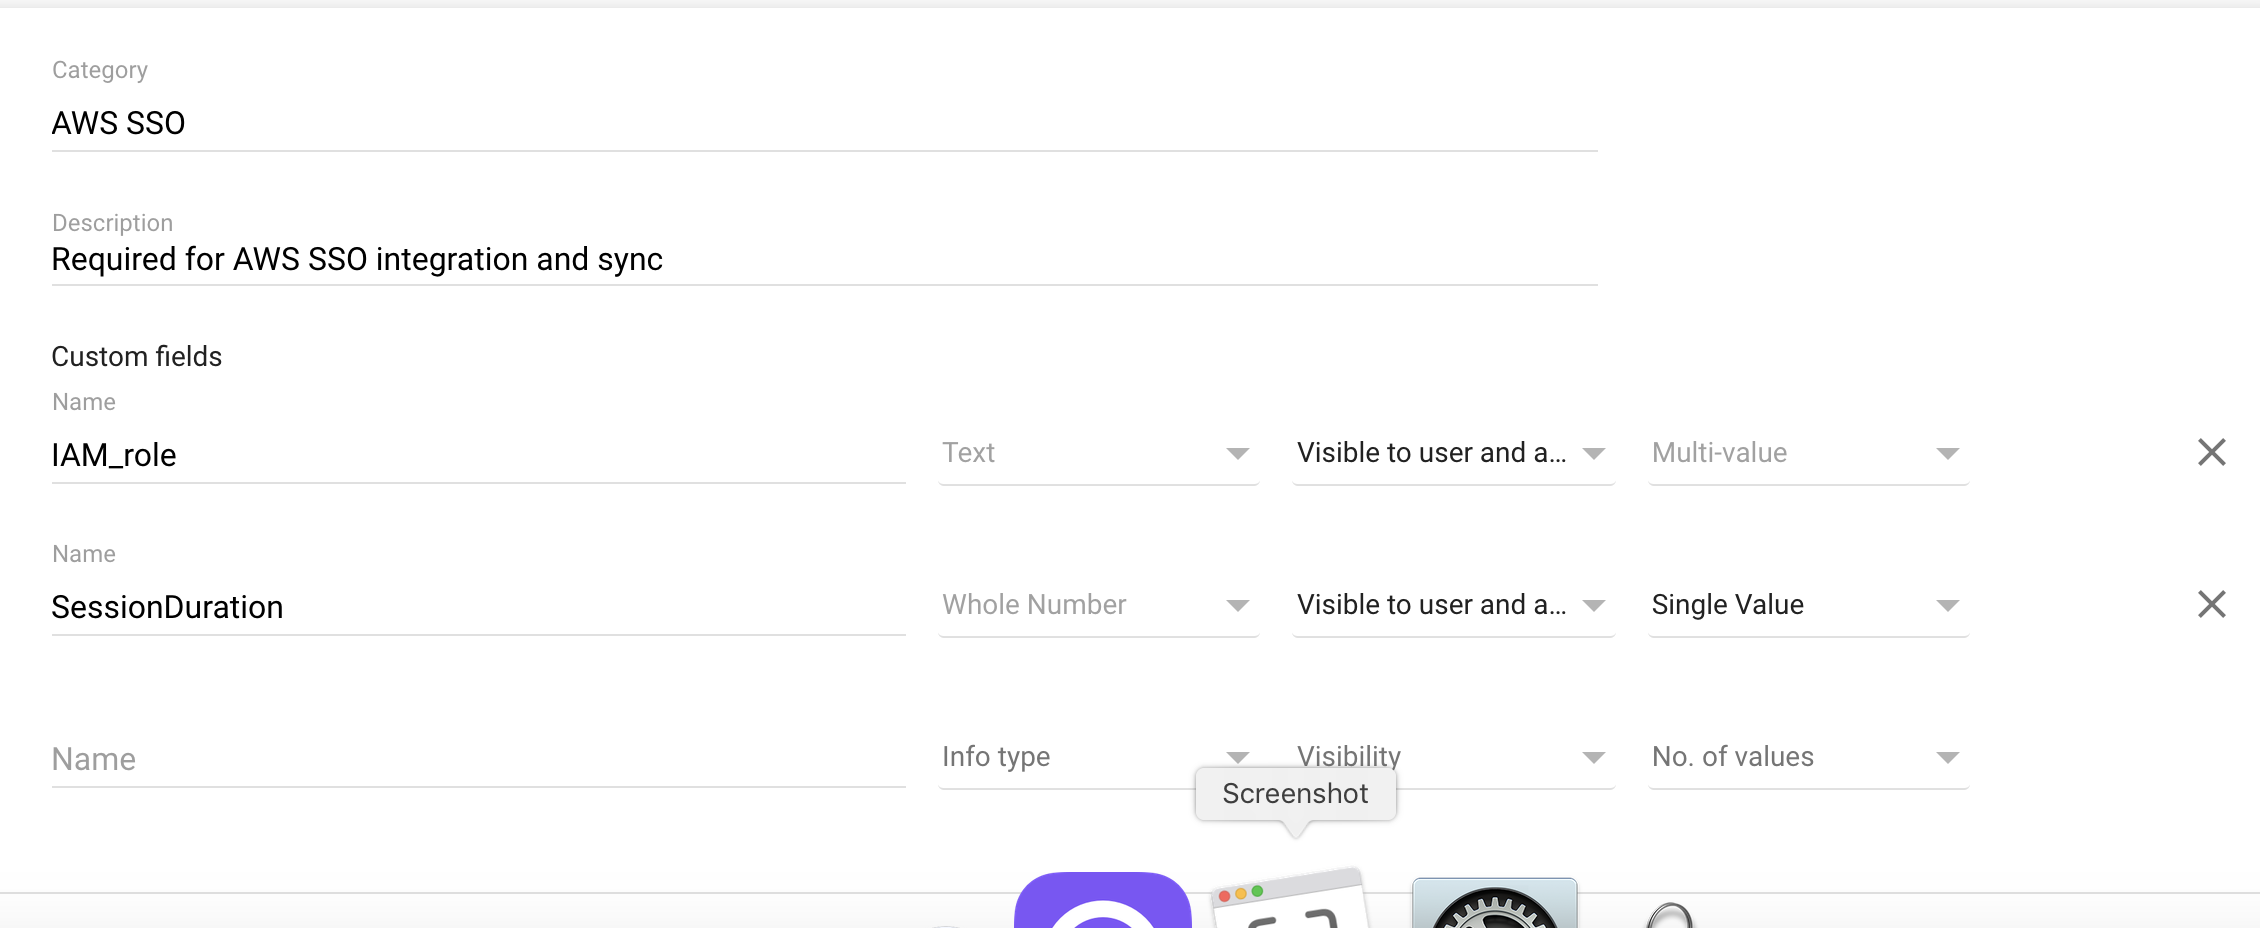
4] You need to give this a Category name, so call this something like AWS-SSO and add a brief description (it is always to document this stuff for those that you work with or who come after you) - I add “Custom attributes required to authenticate G-Suite users into AWS SSO”
5] You will now need to add TWO custom fields - these are case sensitive and should be entered exactly as the following:
- Name: IAM_role
- Type: Text
- Set to Visible to User and Admin
- Set to Multiple Values
- Name: SessionDuration
- Type: Whole Number
- Set to Visible to User and Admin
- Set to Single Value
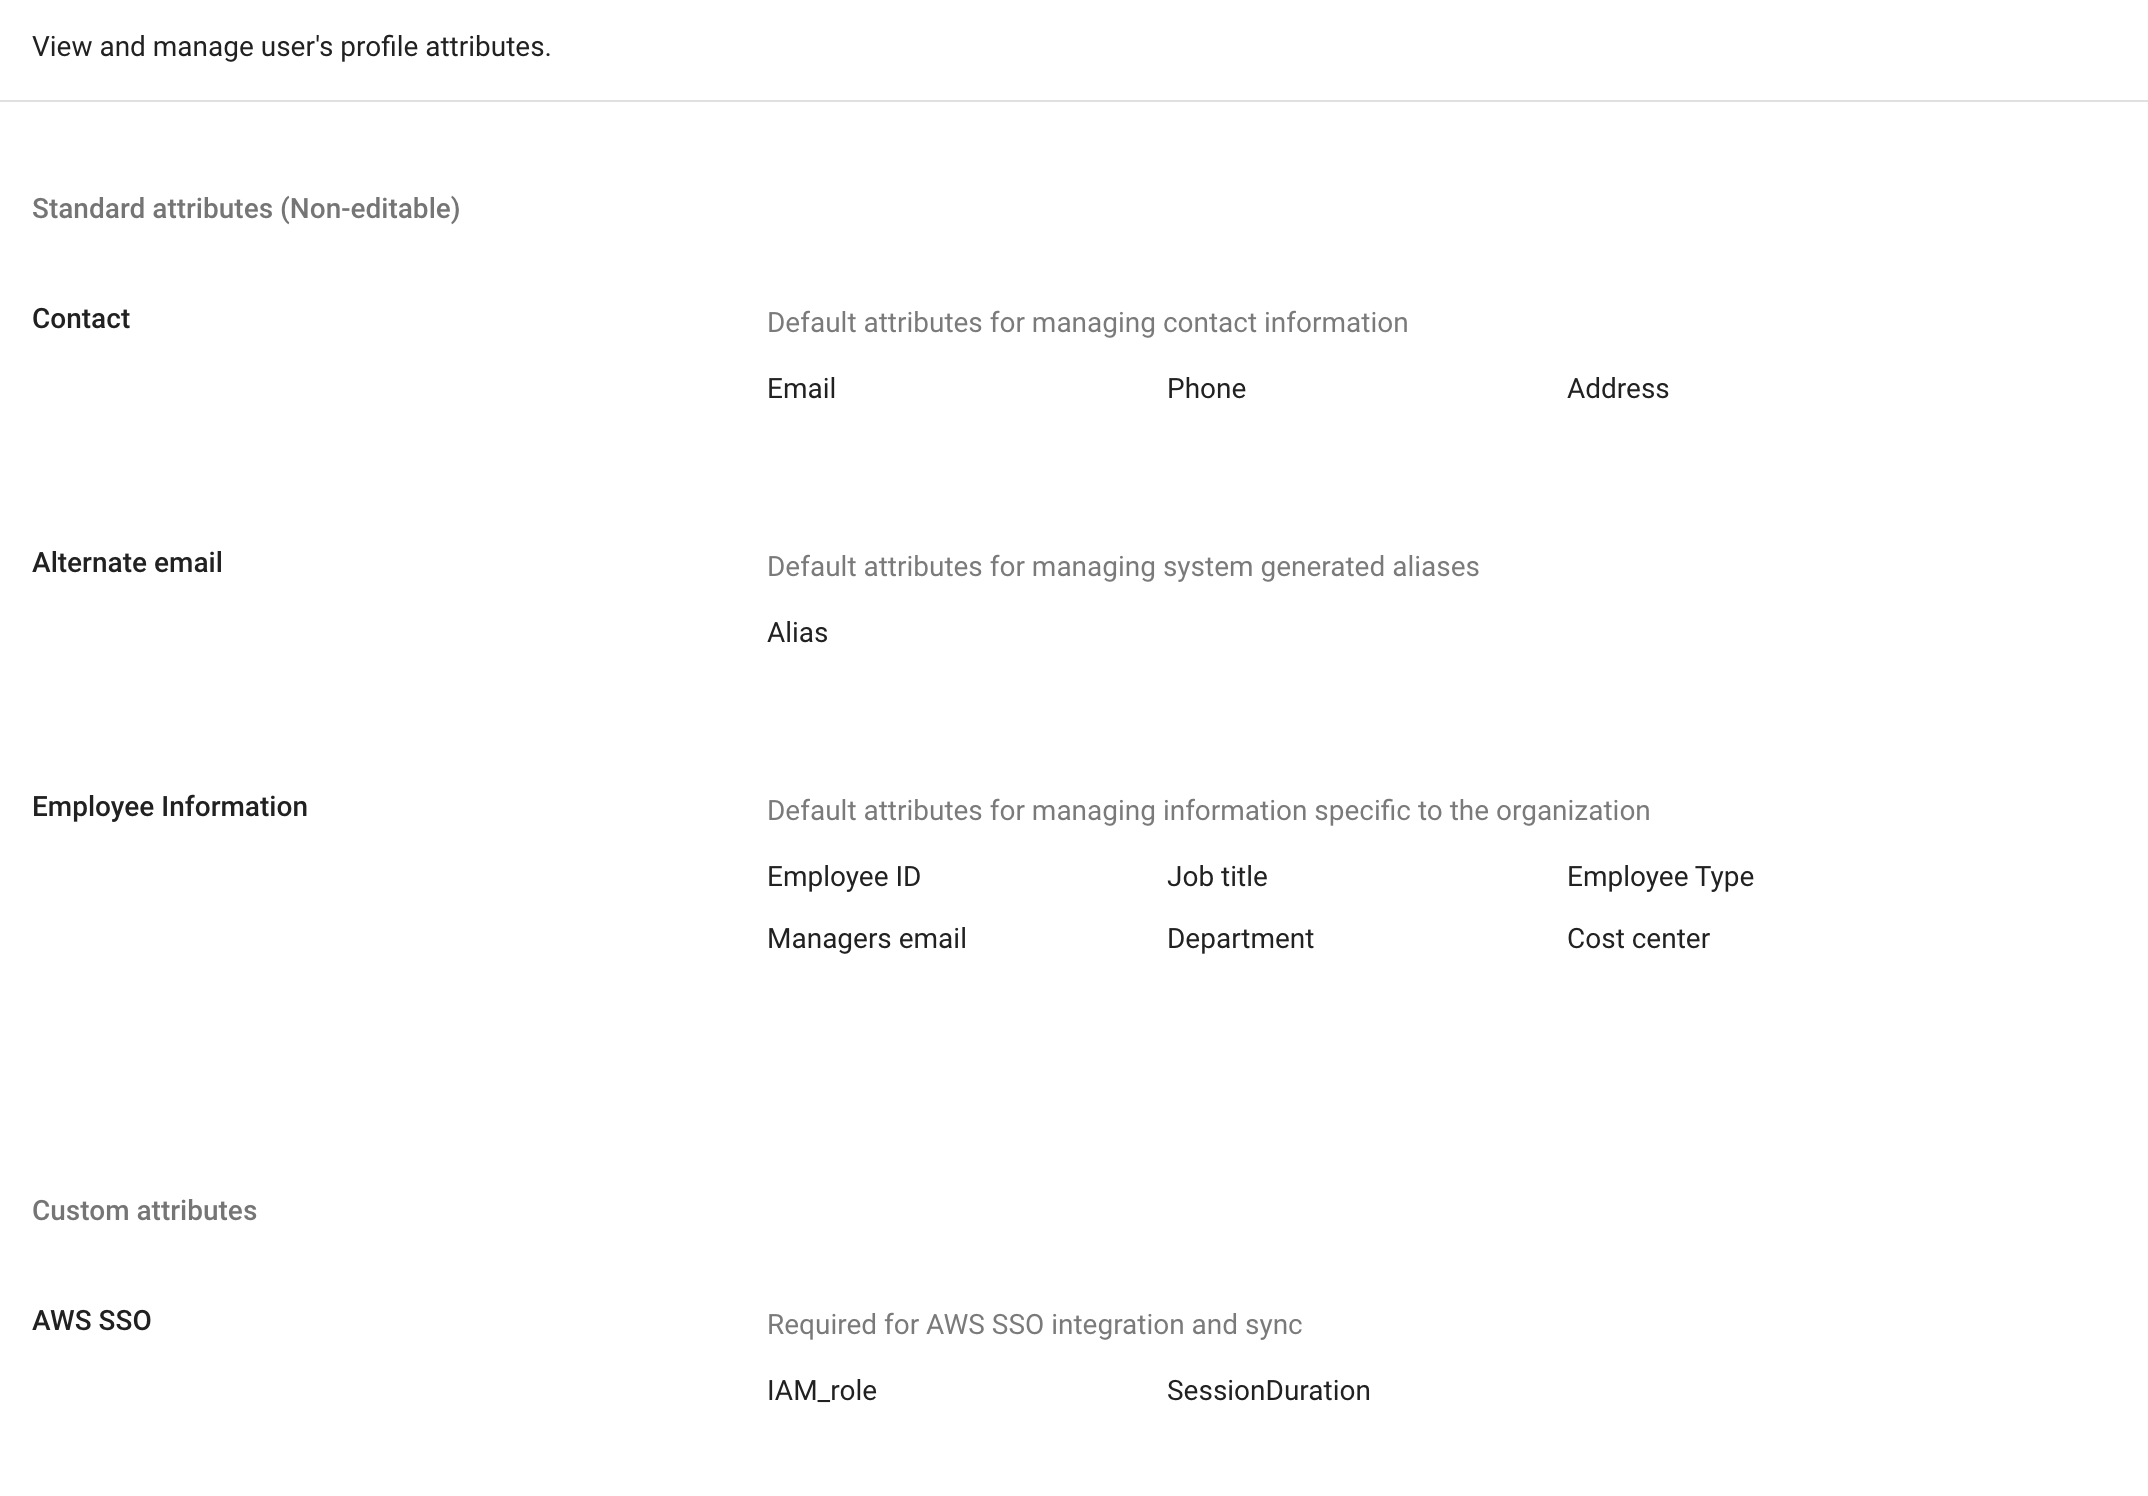
6] Click SAVE and you should now see this appear at the bottom of the attributes screen.
Start the AWS Single Sign on setup
Before proceeding, we now need to setup the AWS SSO as we are going to use some of the information in the next stage when we setup G-Suite to be our identity provider.
1] From the AWS console, go to the AWS Single Sign on console
2] As this should be the first time you are setting up this, you should see this screen. Click on Enable AWS SSO.
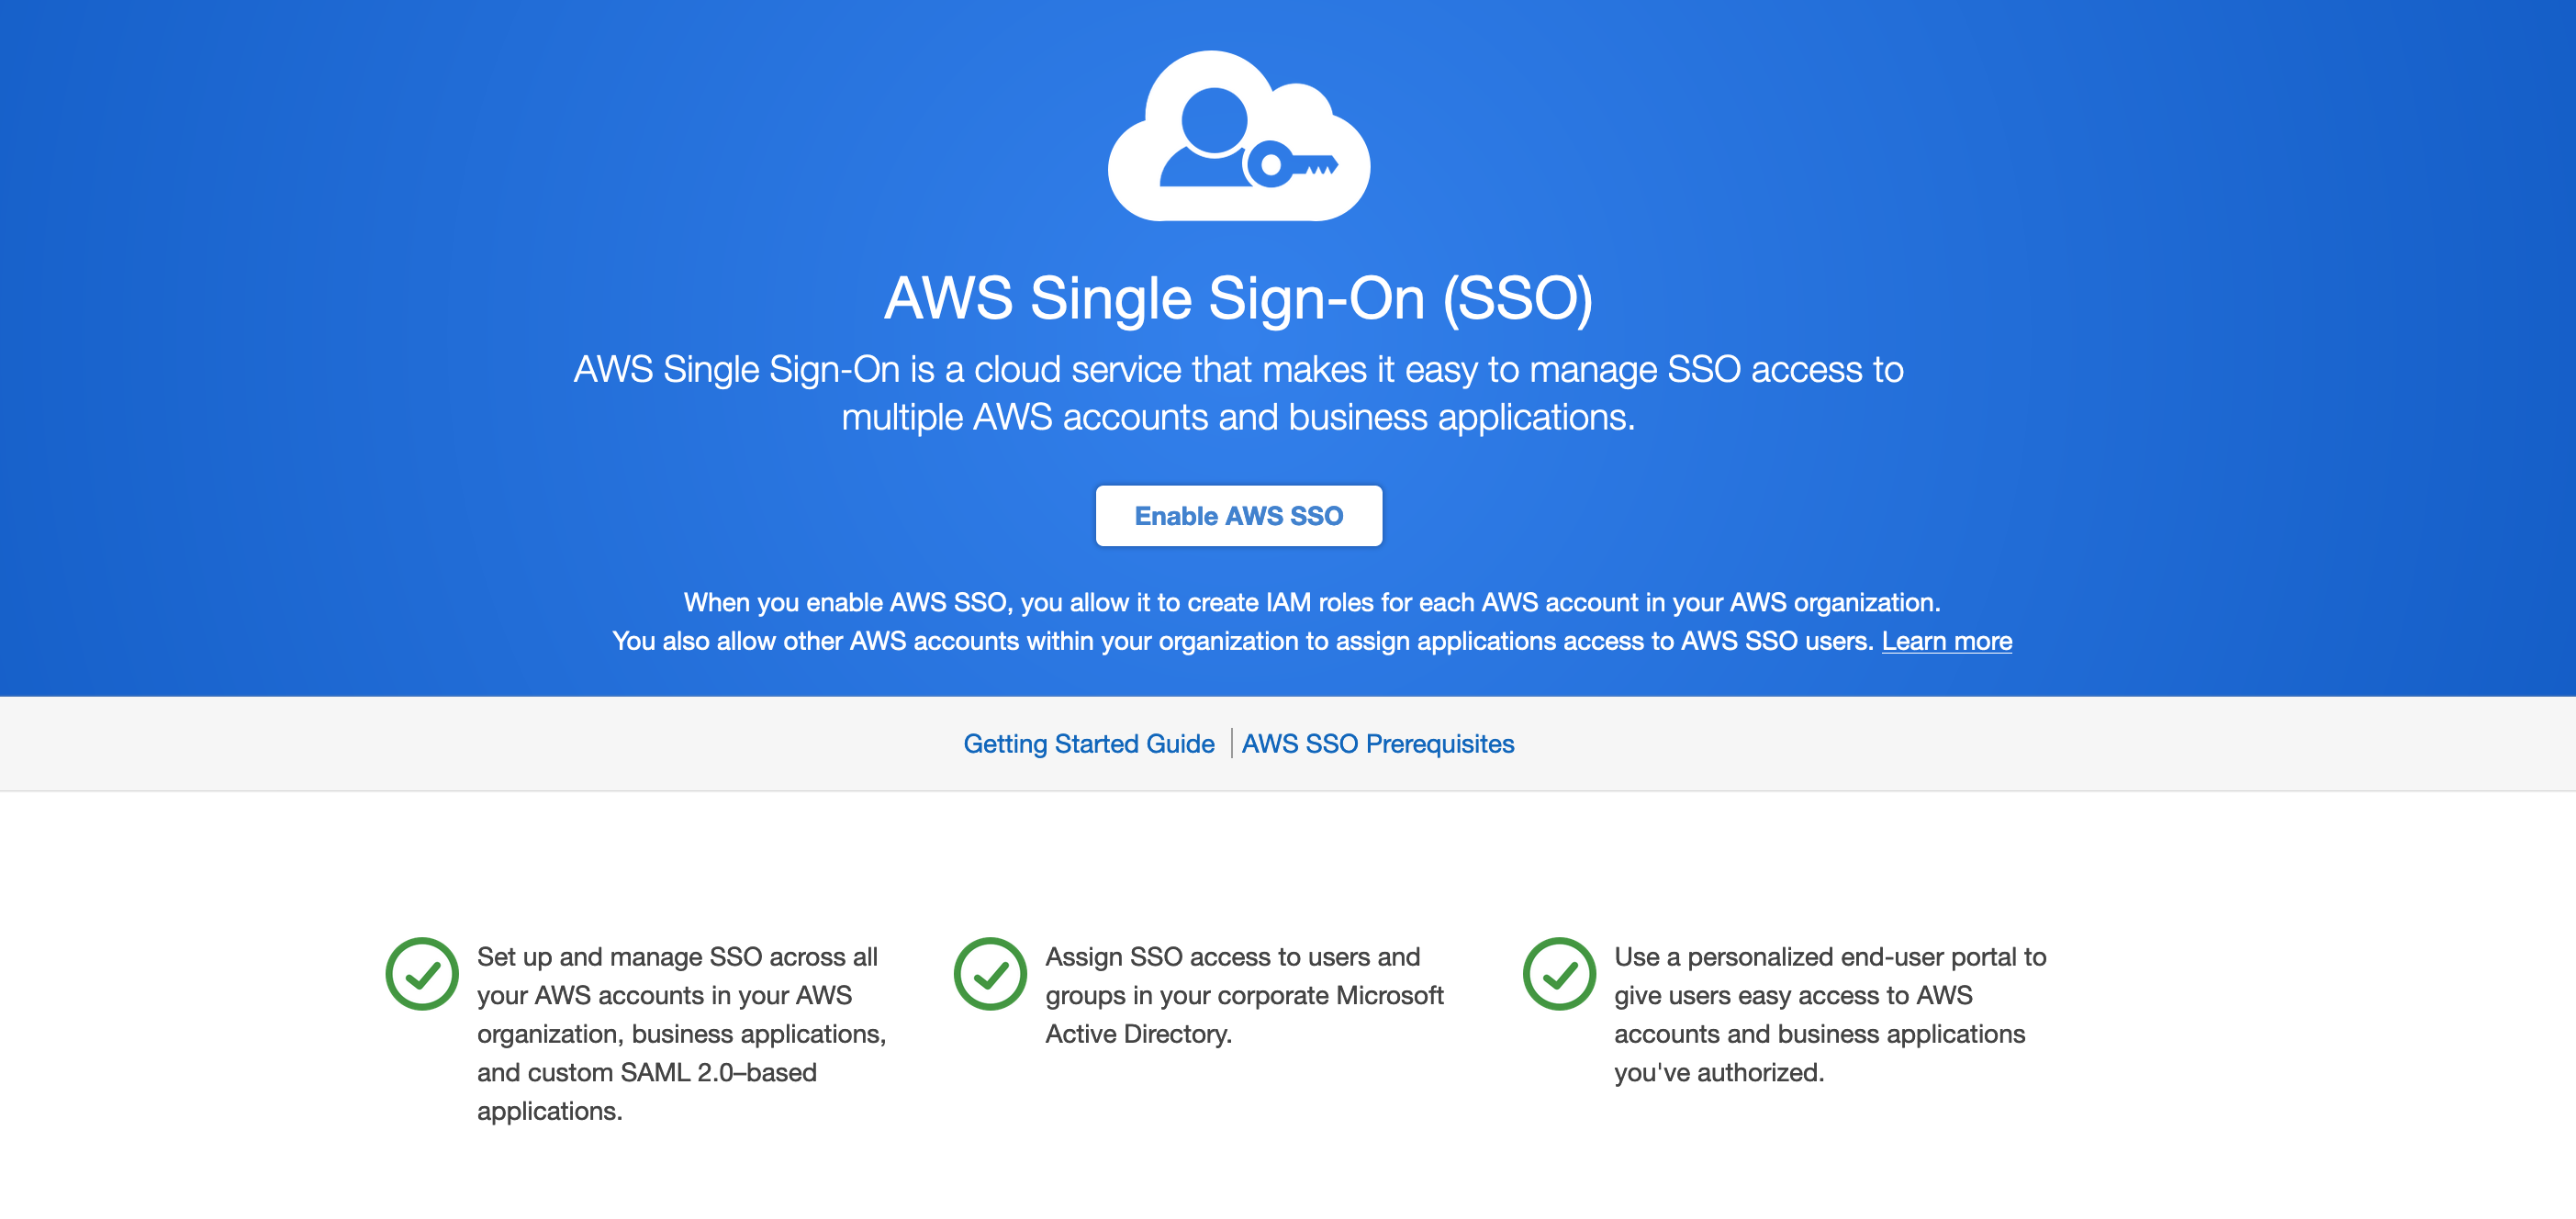
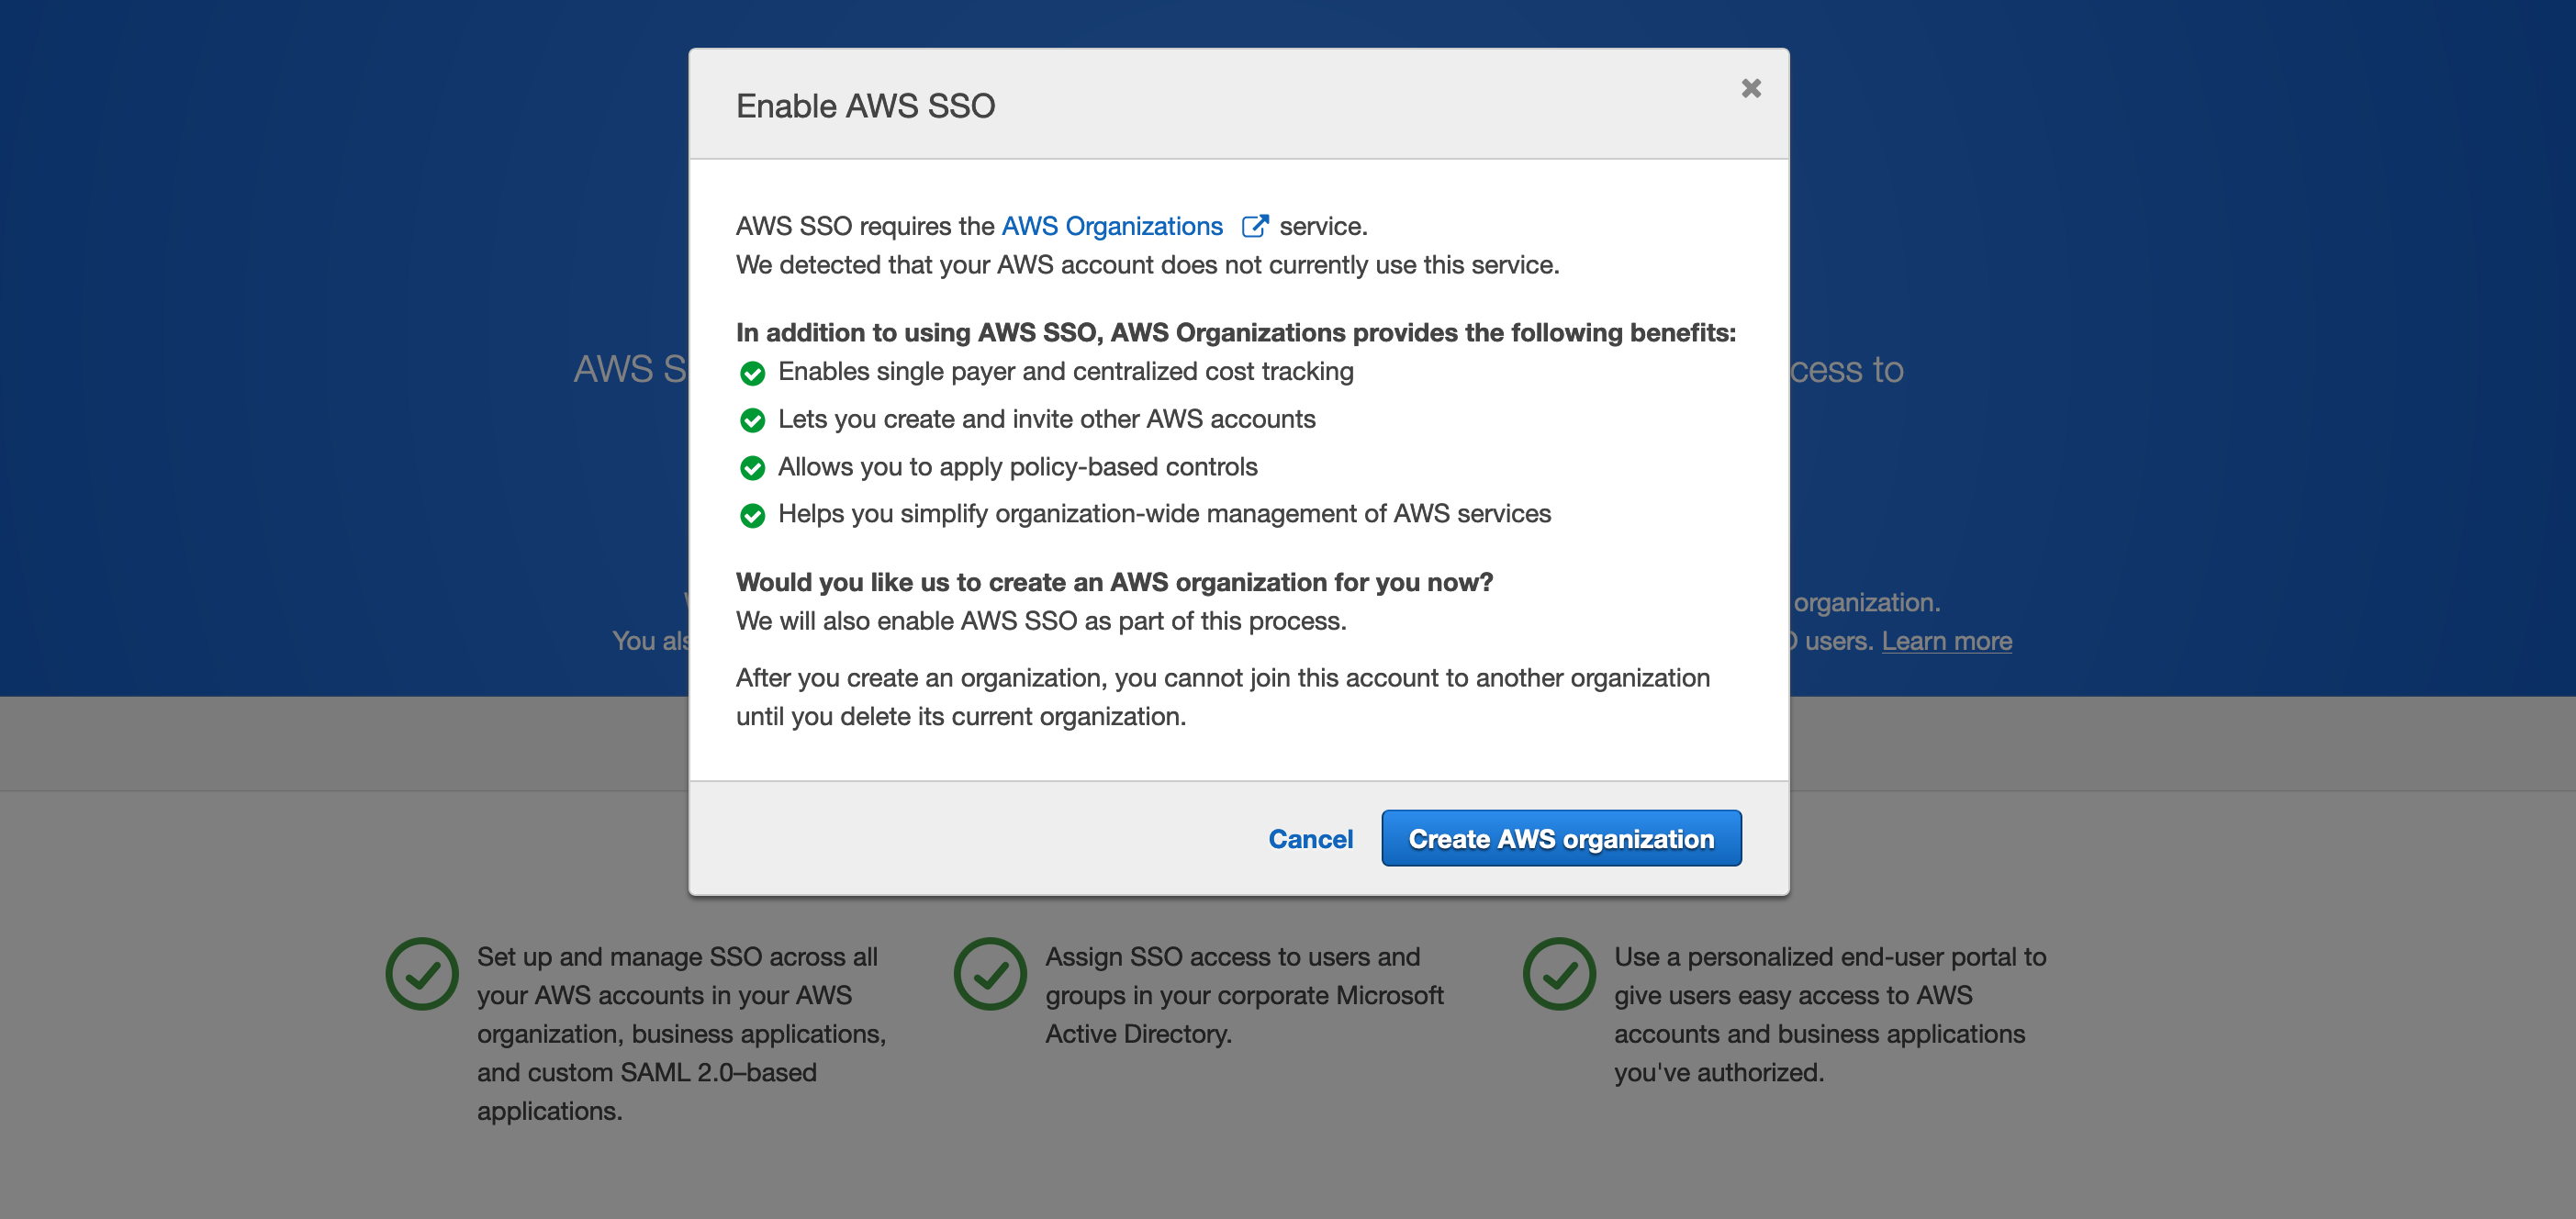
If you do NOT see this, then you (or someone in your org) have probably already setup AWS SSO. Do not proceed until you have resolved this and are able to delete the existing SSO configuration as needed.
3] Once the setup has been completed, you will be on the AWS Single Sign-On dashboard, with three options.
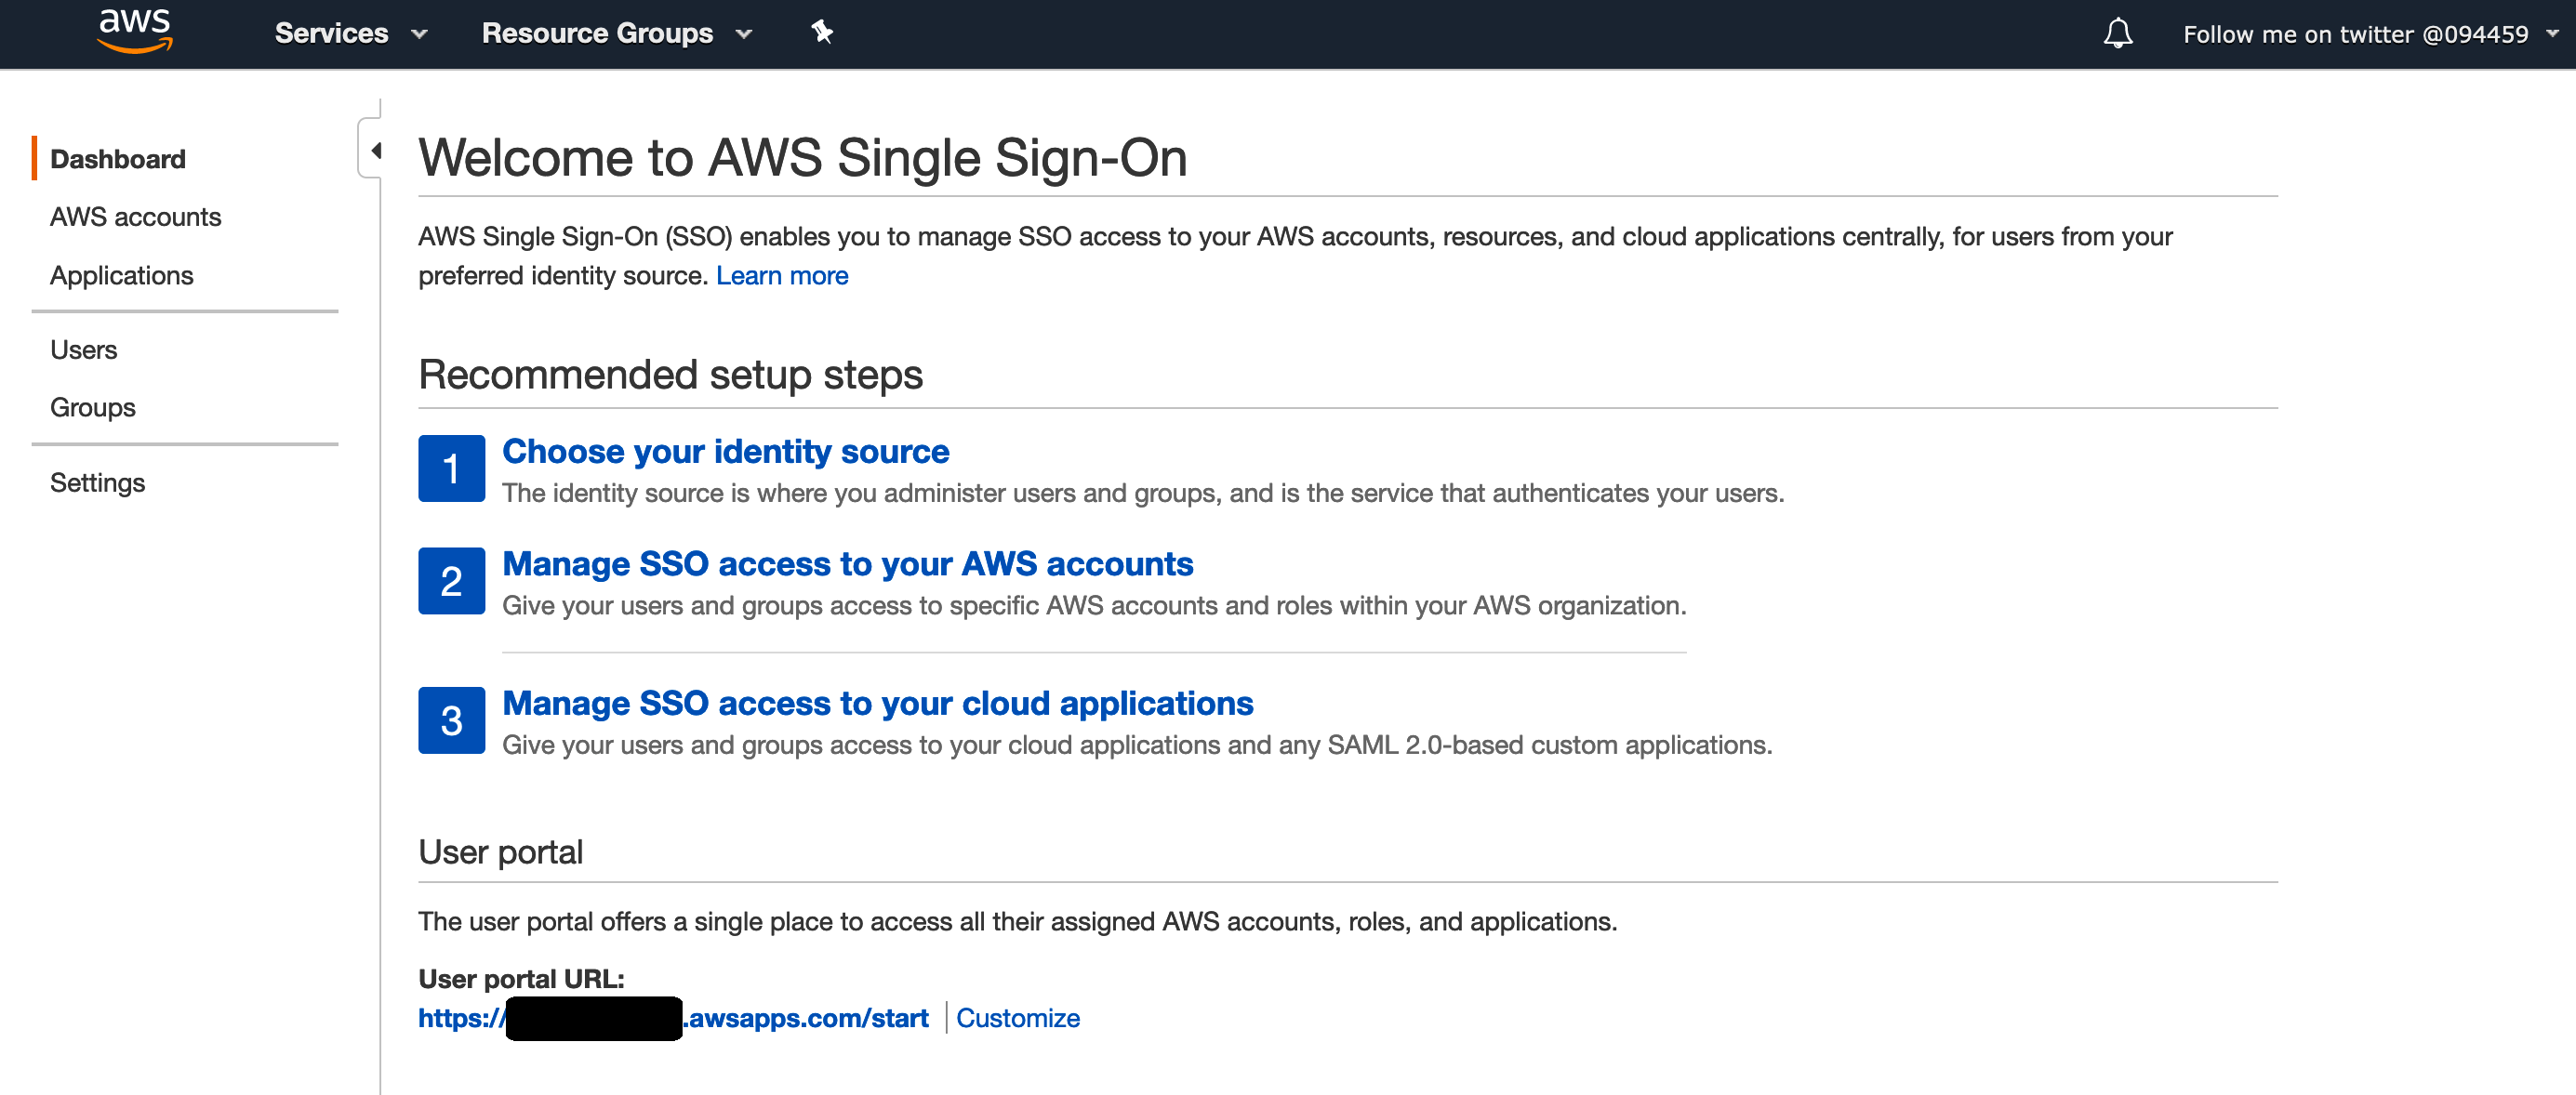
Select 1, Choose your identity source
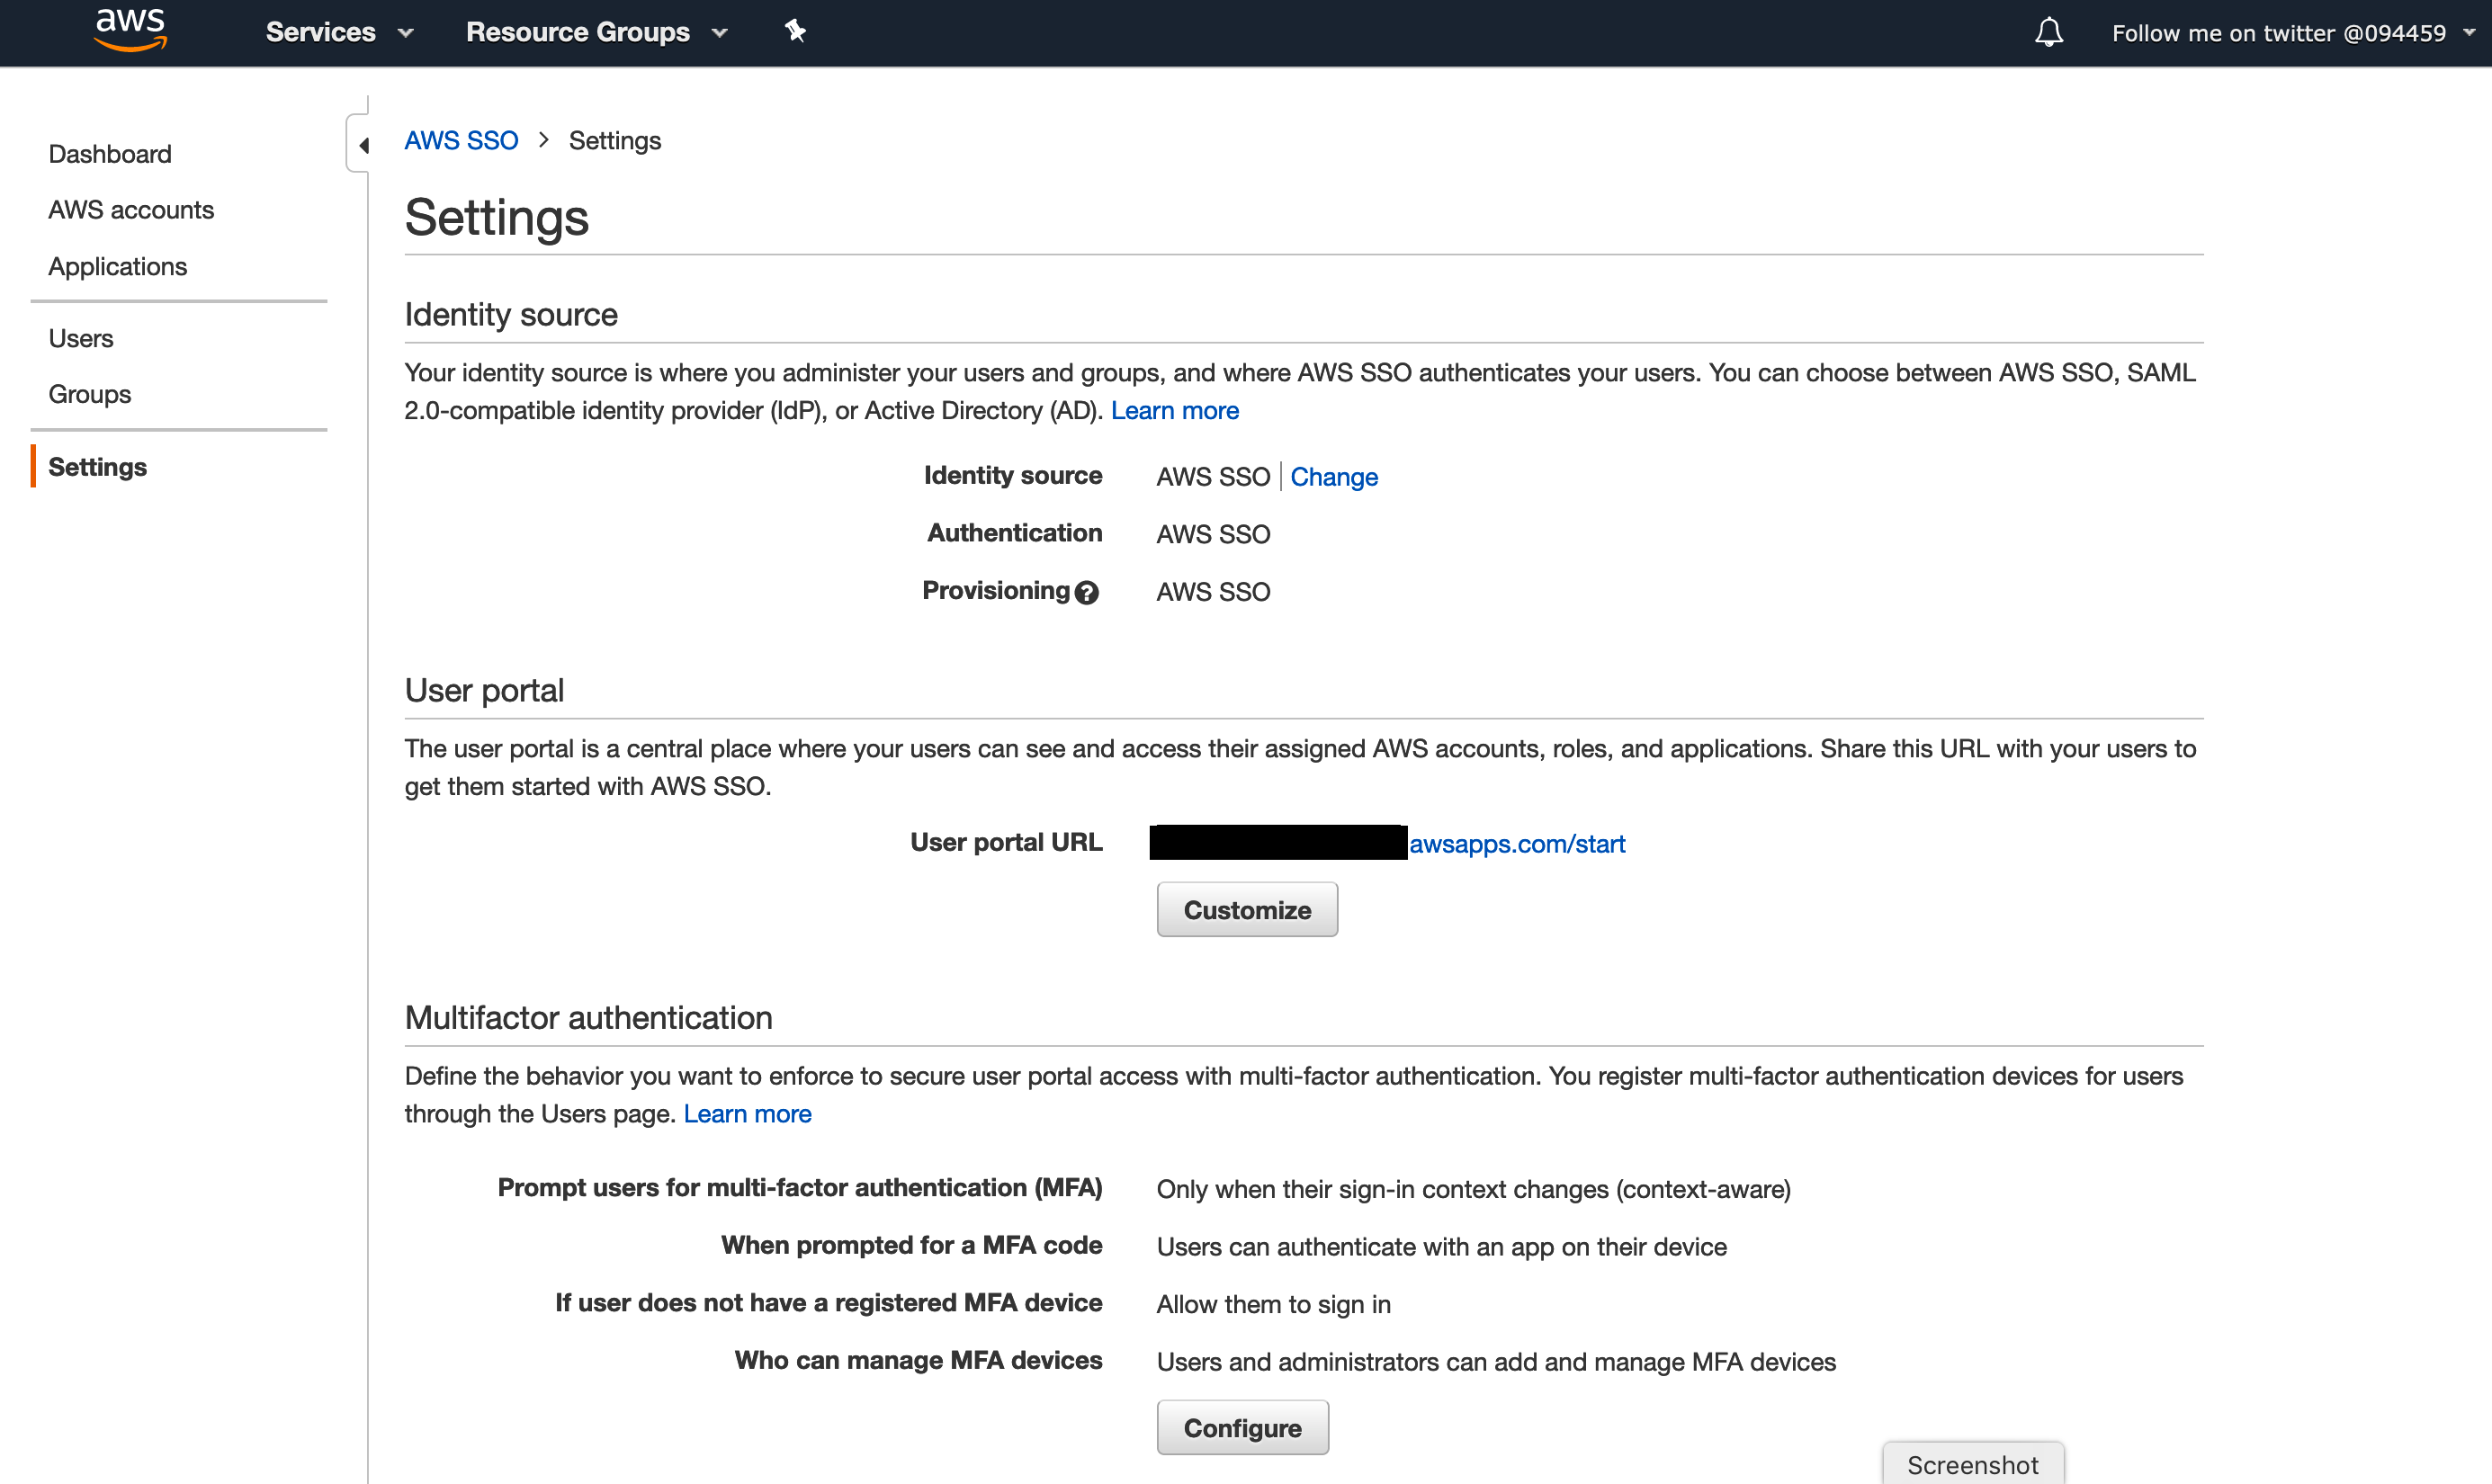
4] In the top section, you will see Identity source set to AWS SSO. Click on the Change link.
5] Change the option from AWS SSO to External Identity Provider
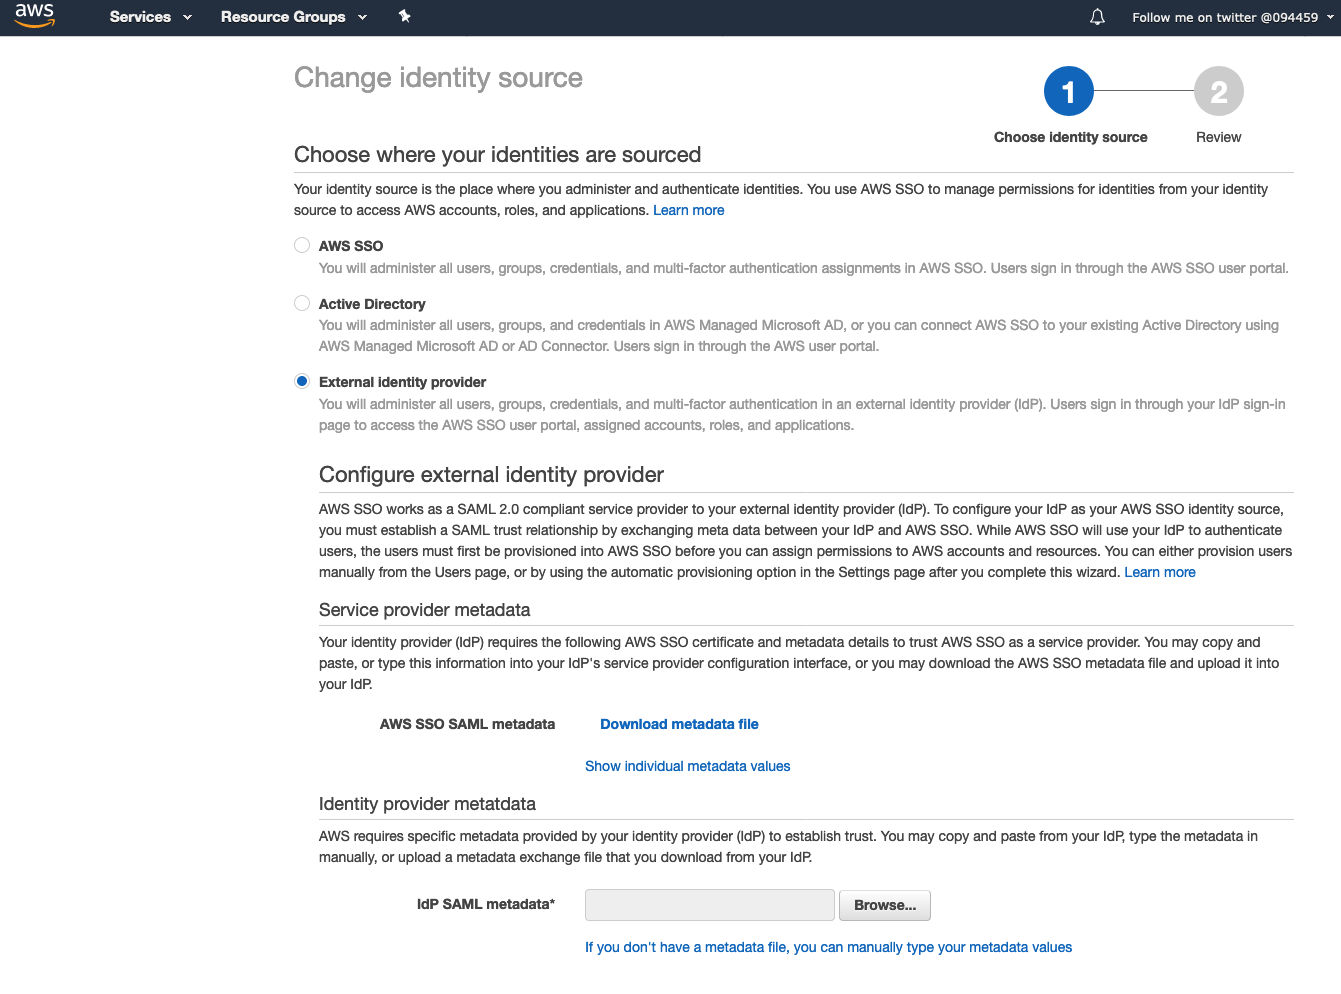
6] Click on SHOW INDIVIDUAL METADATA VALUES to show three links (AWS SSO ACS URL, AWS SSO Issuer URL and AWS SSO Sign-in URL). You are going to need these in the next section.
We now need to go back to the G-Suite Admin console and set it up as our Identity Provider. We are going to use these links to generate the configuration, and we will need to come back to this page to upload the IdP SAML Metadata xml file - so do not close this page!
Setup your G-Suite to be your Identity Provider
The next step is to now configure your G-Suite directory that contains your users and groups to be your identity provider (IdP). We do this by selecting “Apps” from the G-Suite Admin dashboard, and then selecting “SAML apps”.
Click on the round + (Enable SSO for a SAML application) to create a new SAML application. From the screen that appears, select Amazon Web Services.
You will now follow a set of steps to setup your Identity provider.
In the first screen, Google Idp Information, you will see two options listed. Option 1) is a list of URLs and certificate and Option 2) is a file you can download called the IDP Metadata. You want to select Option 2) and download this file. We are going to use that file in a minute.
WARNING!! You must keep this file safe. Do not share it or store it where it can be easily accessed. If this files DOES become compromised, then don’t worry, you can just repeat this process to regenerate the configuration files and certificates.
Click on NEXT until you get to the SERVICE PROVIDER DETAILS and here you will need to use the links from the previous section, as well as some of the custom attributes to configure your Identity Provider.
In the top half of this screen, substitute the following values from what you got in the previous section.
- For the ACS URL use the AWS SSO ACS URL link
- For the Entity ID use the AWS SSO Issuer URL
- For the Start URL use the AWS SSO Sign-in URL
Make sure that the additional settings are also set:
Name ID - Basic Information and Primary Email Name ID Format - EMAIL
When you have confirmed that is setup, click on NEXT and then complete the ATTRIBUTE MAPPINGS. Here you need to make sure you have the correct mappings, and we will use the custom attributes we configured in the G-Suite Directory.
Tip! It can be tricky to view the information on this screen, so just hovering over the link will display the full link to help you. To help you out I have used Inspect to dig these out.
You need to MAP
https://aws.amazon.com/SAML/Attributes/RoleSessionName
to Primary Email
and MAP
https://aws.amazon.com/SAML/Attributes/Role
to IAM_role
Note! You will need to click on the twisty to select whatever you called the category and you should then see IAM_role
From this screen you also need to add a NEW MAPPING.
Create NEW mapping called
and set this to SessionDuration
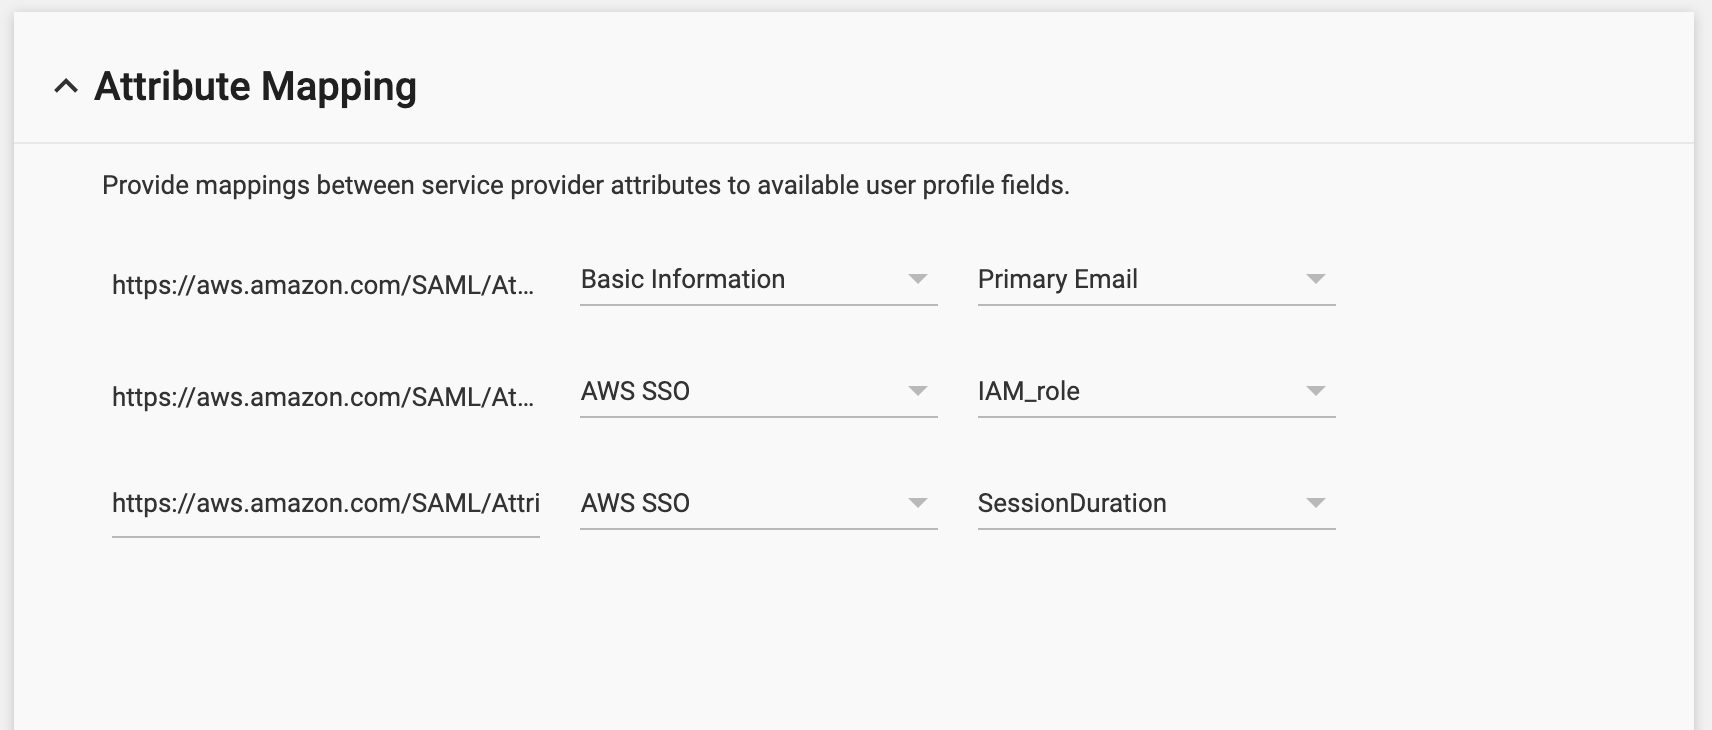
When complete, it should look a little like this. Once you have checked, click FINISH. Now we can complete the setup on AWS Single Sign-on.
Complete the AWS SSO configuration
Go back to the browser tab/screen where you are ready to upload the IdP SAML Metadata xml file. We now have this file (the file we downloaded in the previous section, the one we need to keep very safe), so click on the BROWSE select the file and then click on REVIEW.
On the next screen you need to review so you and understand and then confirm the changes that are about to be made. Do not proceed if you are not sure. If you are happy, type in CONFIRM in the box and click on Change Identity Source button.
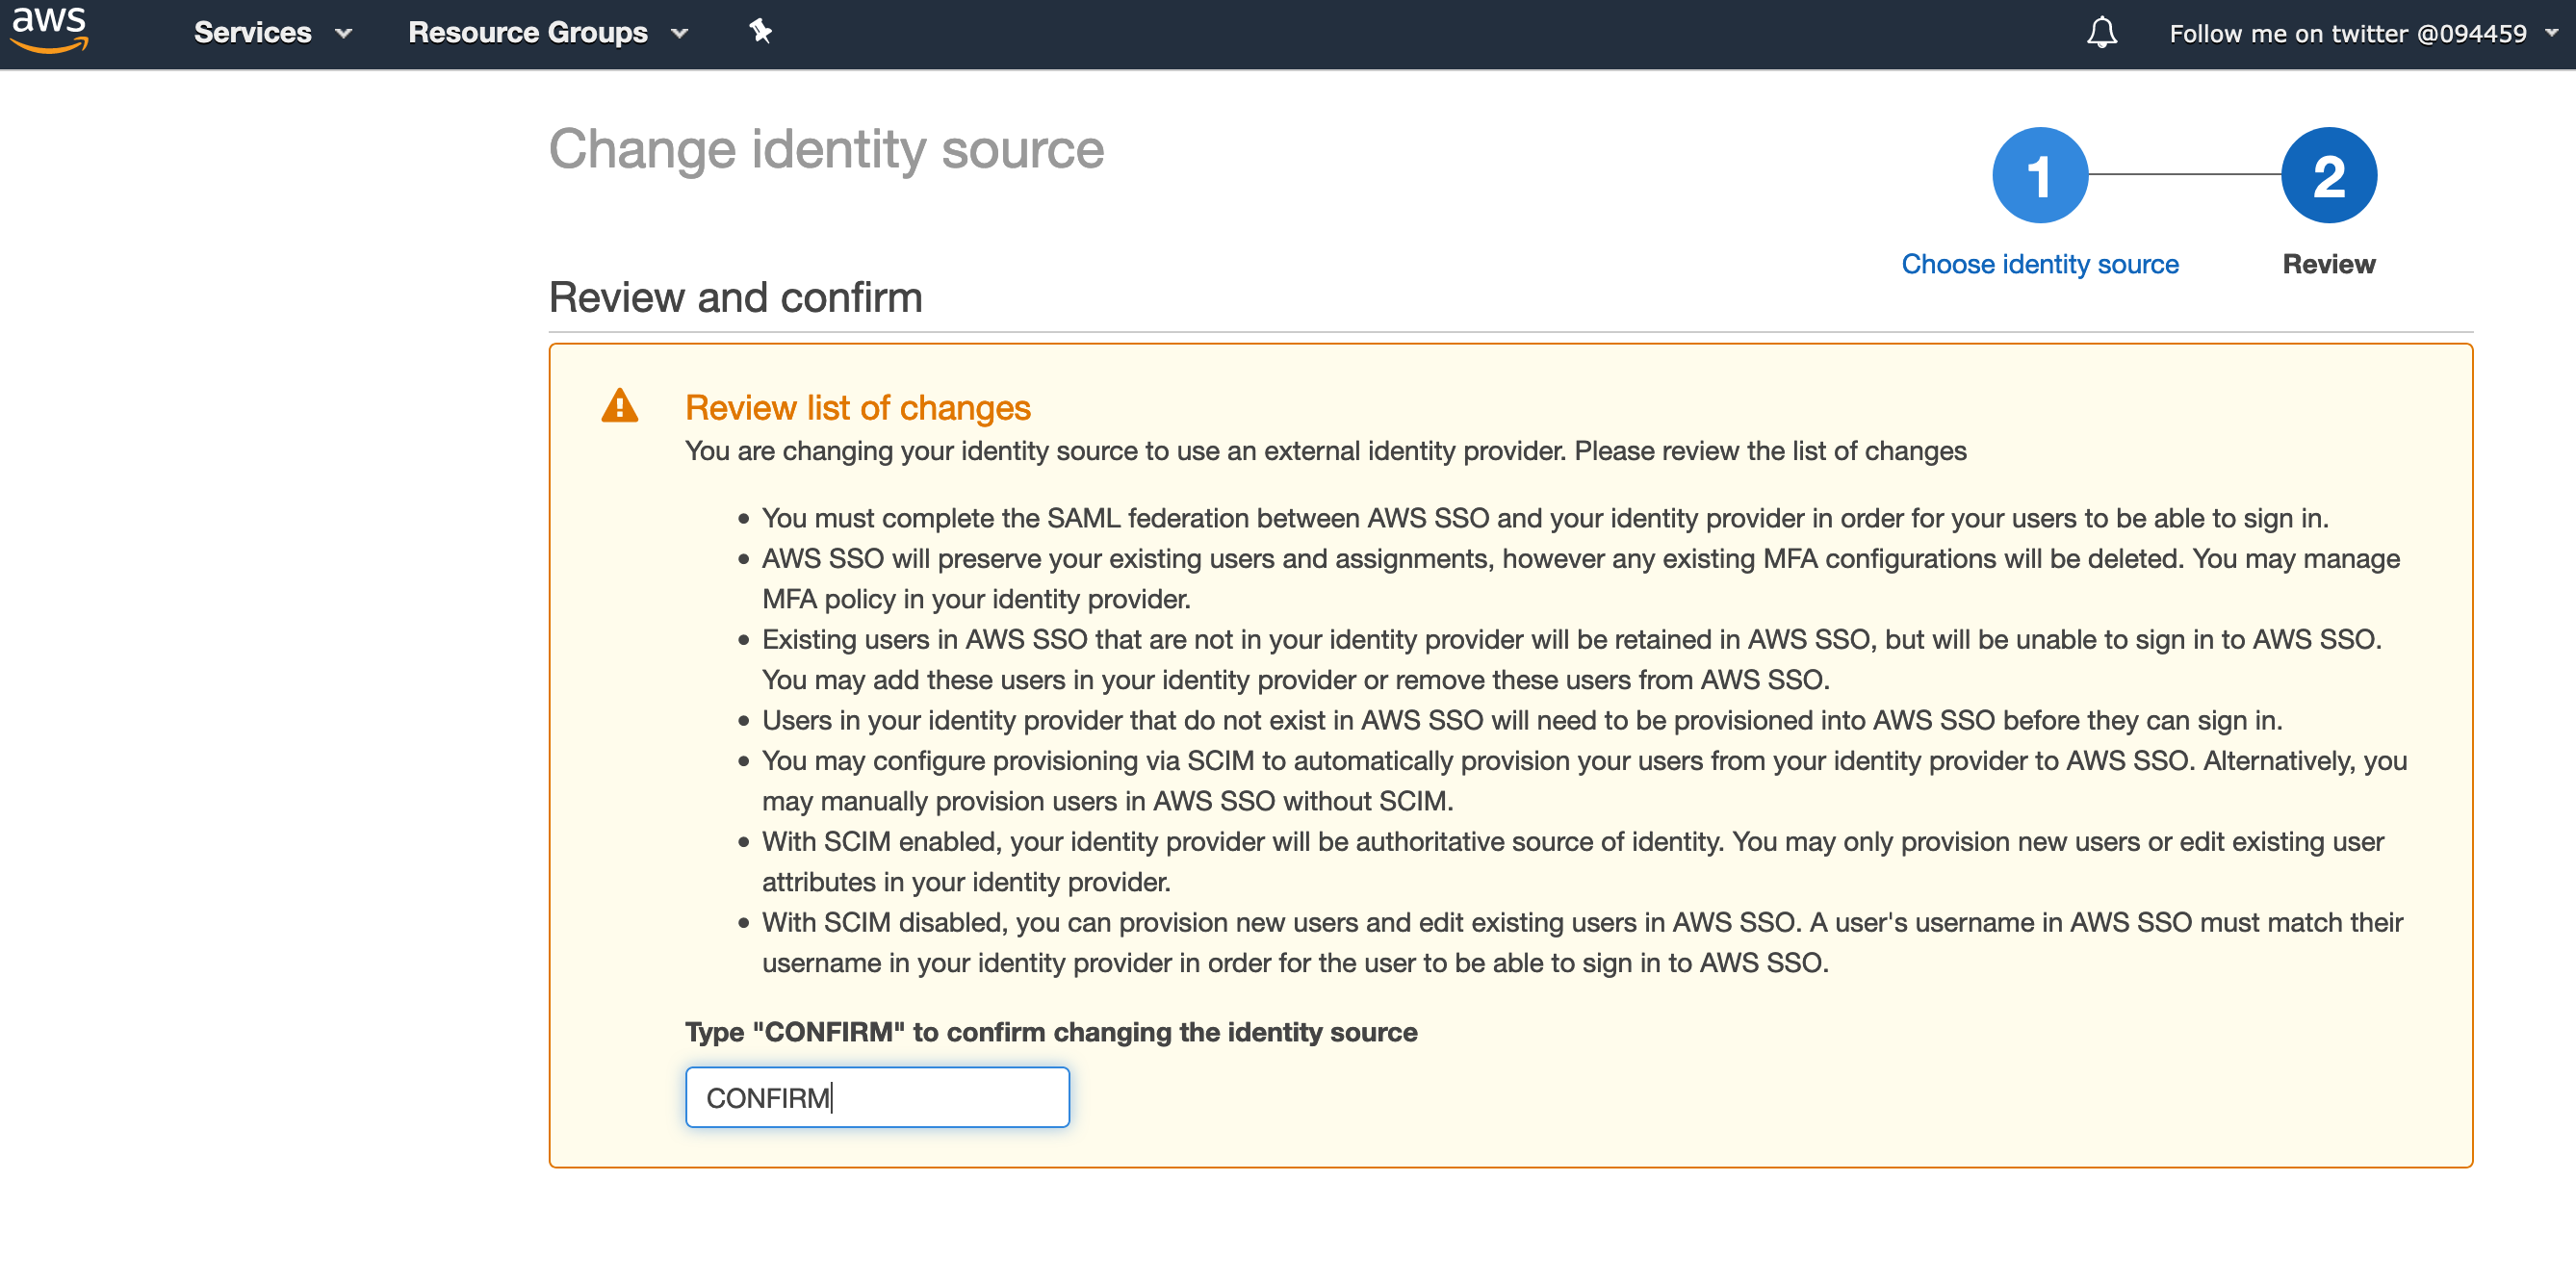
If you are successful, you should get a Complete message with a button to return you to settings.
Troubleshooting! If you do not get this, then there are a few things you can check. First that you have entered the information correctly in the links. The second, ensure you are using the right metadata XML file.
So we have now setup the integration between G-Suite Directory and AWS SSO, but how does AWS know what access to give those authenticated users?
The next step therefore is to a) create the users within the AWS SSO directory that match/map to the users within the G-Suite directory, and b) then map those users to AWS resources and permission sets.
Syncing users and groups - adding users and groups is a manual process prone to error, so being able to sync these between the source (G-Suite directory) and AWS SSO directory is key. See later on in this blog on how you can do that with a great open source project.
From the AWS SSO Dashboard screen, select USERS from the left hand menu. Click on ADD USER and then complete a profile, using the email address EXACTLY as it is in the G-Suite directory for the Username as well as Email fields. Once you have added a user, create a group and add the user to that Group.
Click on AWS Accounts, and you should see a screen that will show you AWS accounts (this will vary from person to person, but it you are trying this out on your own personal AWS environment, you will see a single AWS account, if you are doing this at work and have a number of AWS accounts under your AWS Organisation, you will see more).
Click on the AWS account you want to assign / map one of the G-Suite user IDs to. Once you click on the AWS account, you can then click on ASSIGN USERS. On the next screen, click on the GROUPS tab, and select the group you setup in the previous step.
Groups not Users - in this walkthrough I am using groups as I do not like assigning accounts and permissions sets to individual users.
Once you have selected it, click on the PERMISSIONS SETS. This screen will allow you to define what permissions you want to give this user. There are a set of standard templates you can use (for example, Administrators, with full access) but you can create your own custom ones too. Click on CREATE NEW PERMISSIONS SET and from the screen that comes up, select an existing template (Use an Existing job function policy) - you can see the Create a custom permission set below, I will not cover these here, but you can see where you would set this if you wanted to refine the permissions.
Select AdministratorAccess and then click on CREATE. Once complete it should return you back to the previous screen. Click on the checkbox next to AdministratorAccess and then click on FINISH.
Now, we are not quite ready to test this, but we are almost there. Just one more thing to do.
Enabling and then testing the setup
When we setup the Identity Provide on G-Suite, the default setting is to DISABLE it for everyone so we are now going to need to go back and ENABLE this.
What this is doing is allow either ALL or a subset of your G-Suite users to have access to this AWS SSO integration. Check your G-Suite documentation on how to manage this, as this is outside the scope of this post.
For the purpose of testing, we are going to ENABLE FOR ALL - this means that anyone who is a user within my G-Suite directory, can SSO into my AWS account.
Testing
So, we have completed everything we need to do, so are ready to test. In the steps above, a login link was displayed. This link is called the AWS SSO Sign-in URL, and will be in the format of
https://{identifier}.awsapps.com/start
You can also customise this against a global namespace, so you will need to make sure whatever you set that it is unique.
Click on the link, and this should redirect you to Google so you can authenticate and once you have successfully done that, you should be presented with this screen.
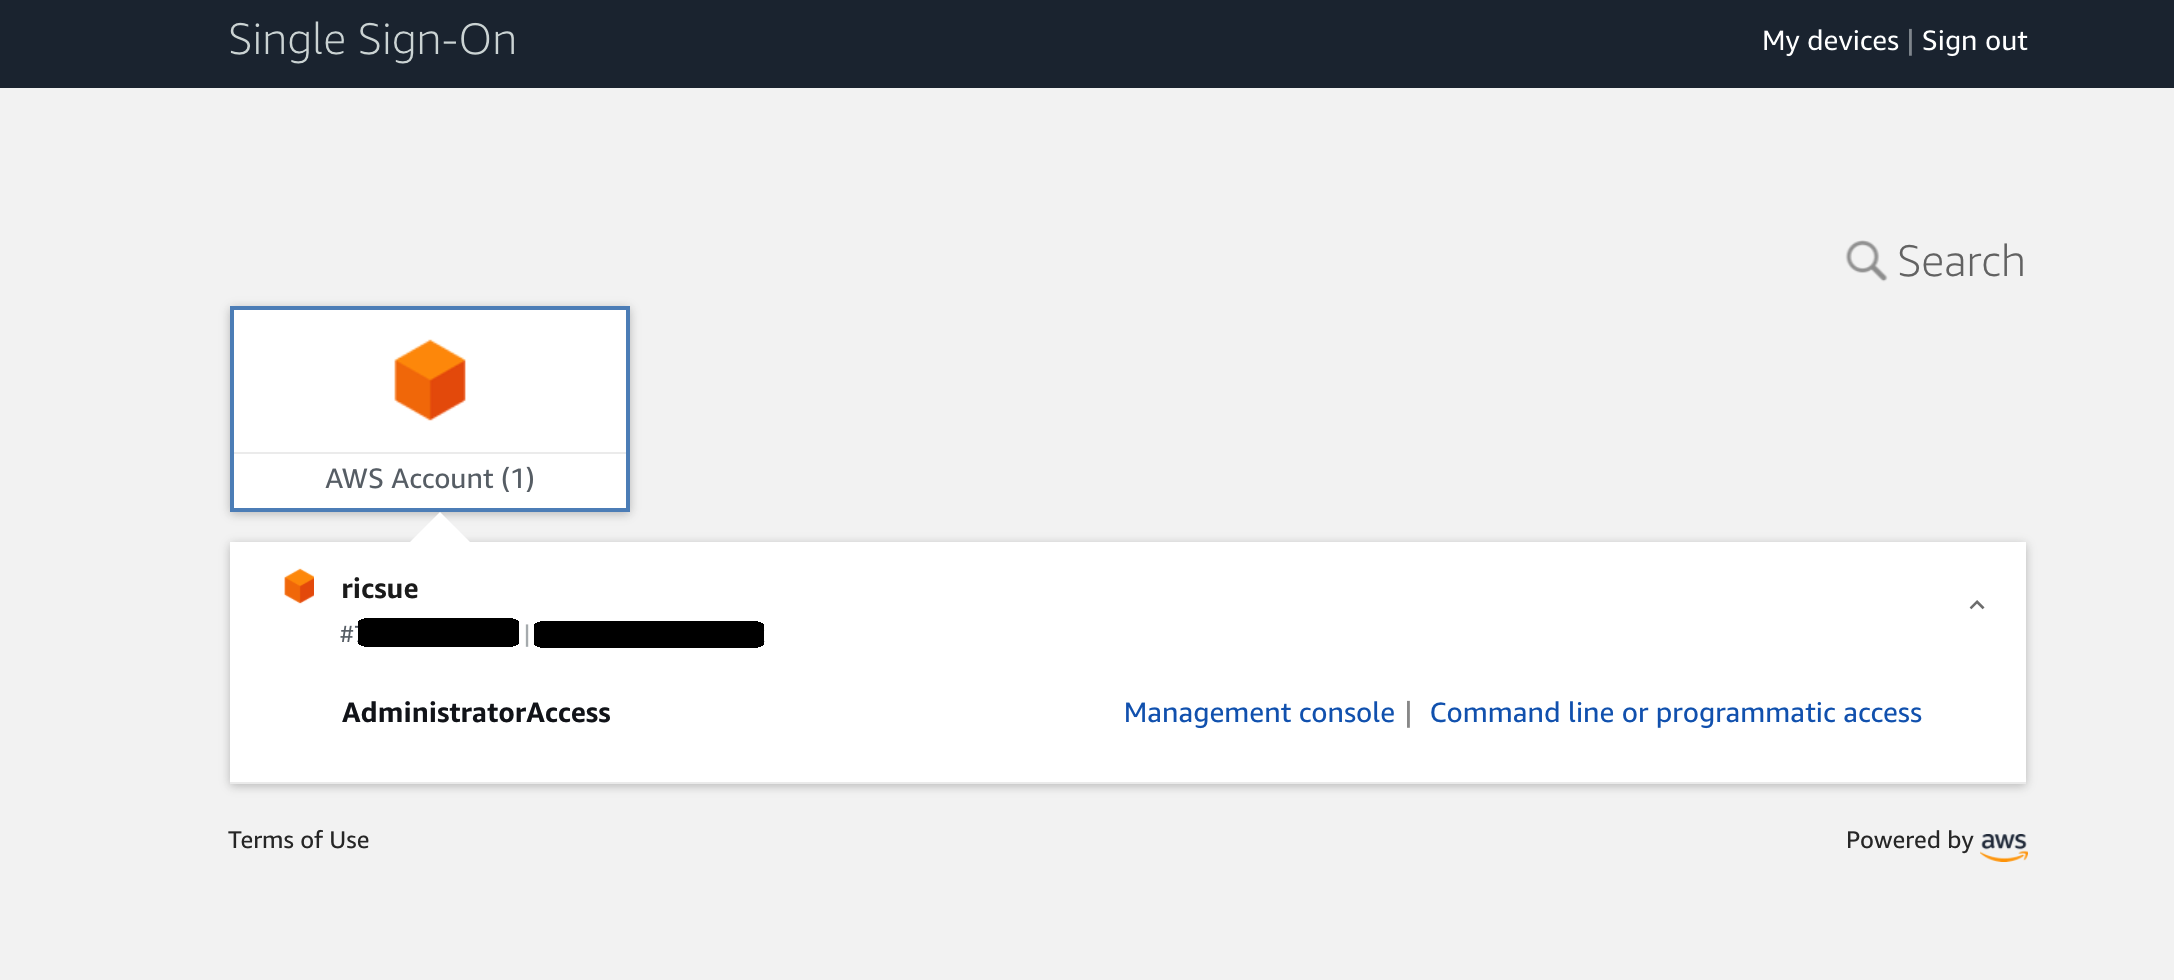
Congratulations, you have now logged in using your G-Suite identity.
Troubleshooting! If you get the following error when logging in, you either have not setup a user in AWS SSO User, not mapped a user to a permission set or not used exactly the right information in the User details - check all three and you should resolve your problem.
Syncing your users and Groups
What you really need to do next is ensure that you can synchronise your user and groups from your G-Suite directory to the AWS SSO users and groups. In this step, we will use an open source project called ssosync (GitHub repository here) to automate this.
Installing the SSO Sync Tool
From the GitHub repo README.md file, you will need an environment where you are going to check out the code and run it. For the purpose of this post, we will use a local dev environment (I am using my Mac)
Configuring the SSOSync on GCP
You will need to following the instructions under the Google section. Do not worry about whether you have a GCP environment, you will not need to sign up for that to get this working. The output of this process is to generate the configuration on the Google side and then two configuration files (below) that you will use during the sync process.
Changes you need to make to your G-Suite security settings
When following these instructions, make sure your G-Suite security settings allow your sync process to access its APIs. Make sure you review your security settings for your G-Suite environment. You might be using third party tools to do this, but if you get the following error when you set this up, this will mean you need to review your settings to enable the tool to access your G-Suite Directory
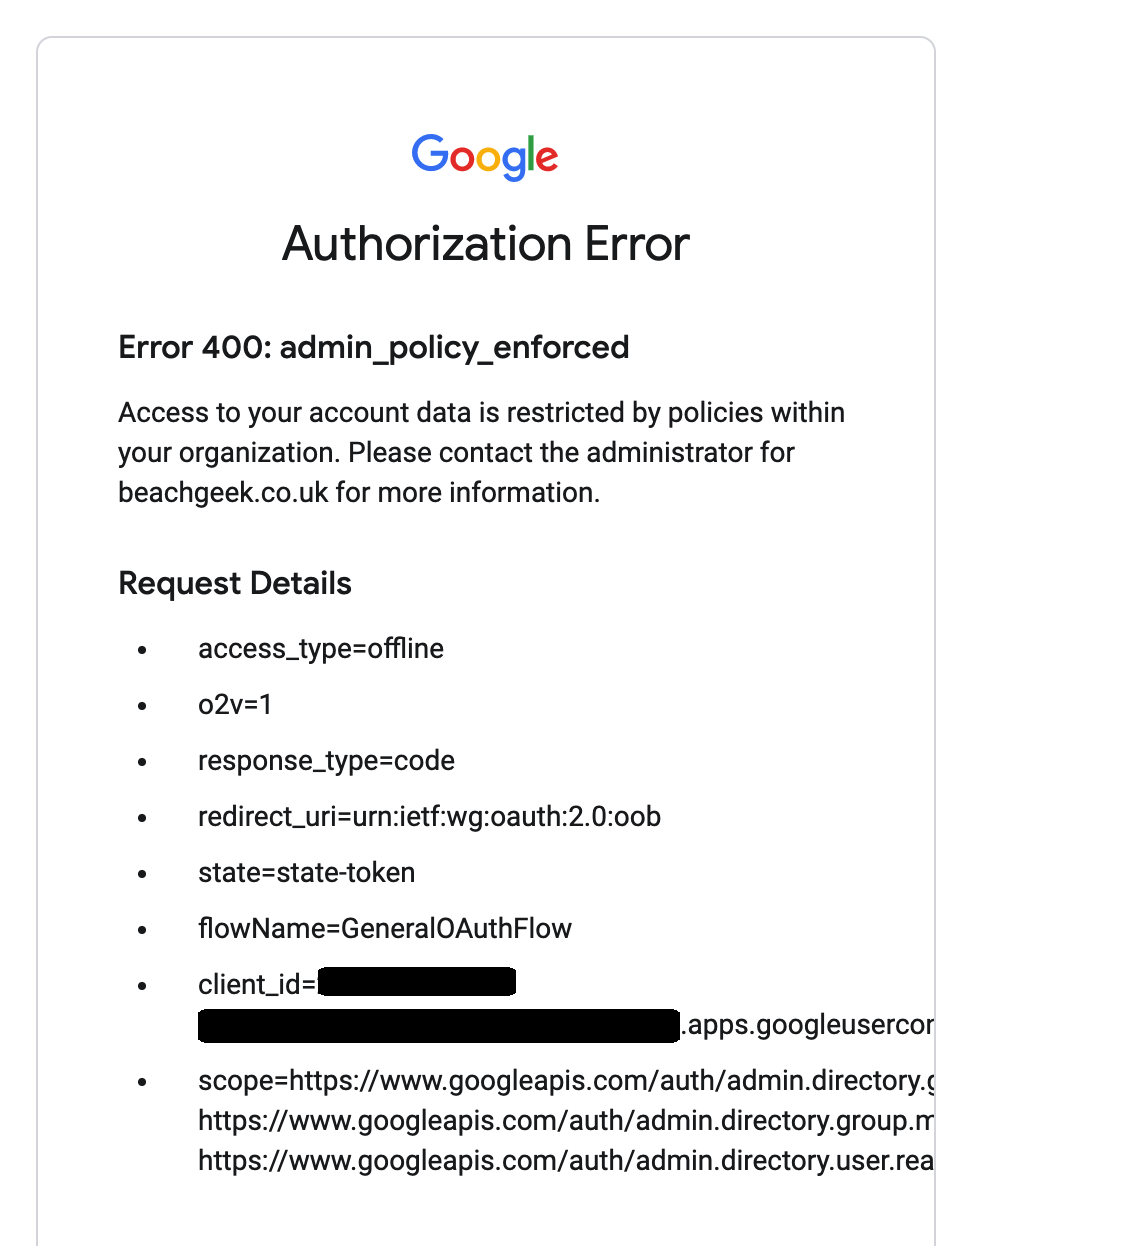
If you are just using the default tools, Enabled the TRUST INTERNAL, DOMAIN OWNED APPS (this is disabled by default)
Note! Before making this change, you should check that this will not have any other impacts for your G-Suite environment.
Completing the GCP configuration
Once you have finished the setup instructions, you will have the following artefacts in your local environment:
- the ssosync executable for the runtime you want to run this on
- a credentials.json file
- a token.json file
Complete the AWS configuration
From Settings in your AWS SSO, Under Identity Source you will see there is a Provisioning options. There will be a link to ENABLE AUTOMATIC PROVISION. Click on that link.
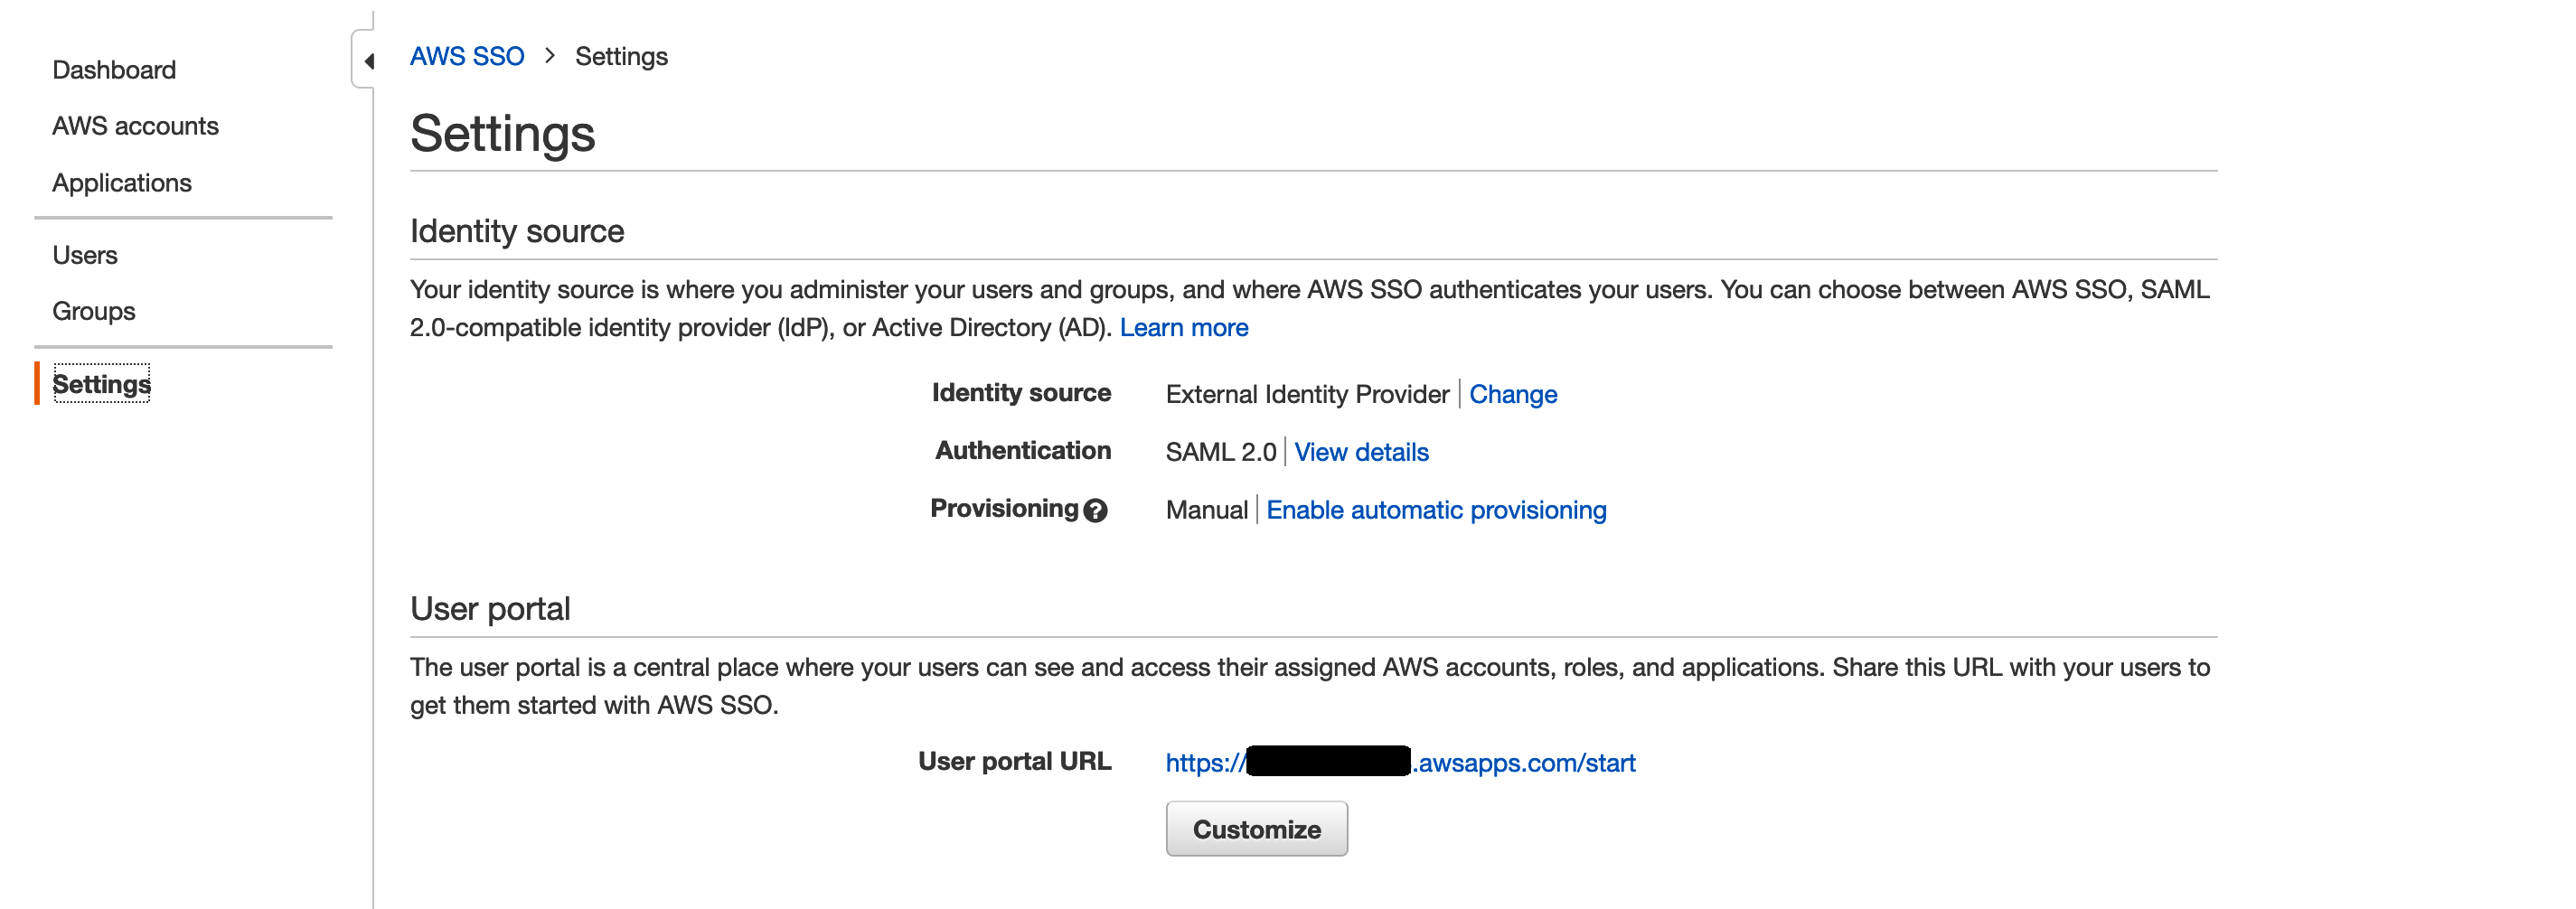
When you click on this, you will see an SCIM endpoint and the Access token (which will be hidden). You will need to create a file that the ssosync will use to authenticate and then interact with your AWS SSO user and group repository.
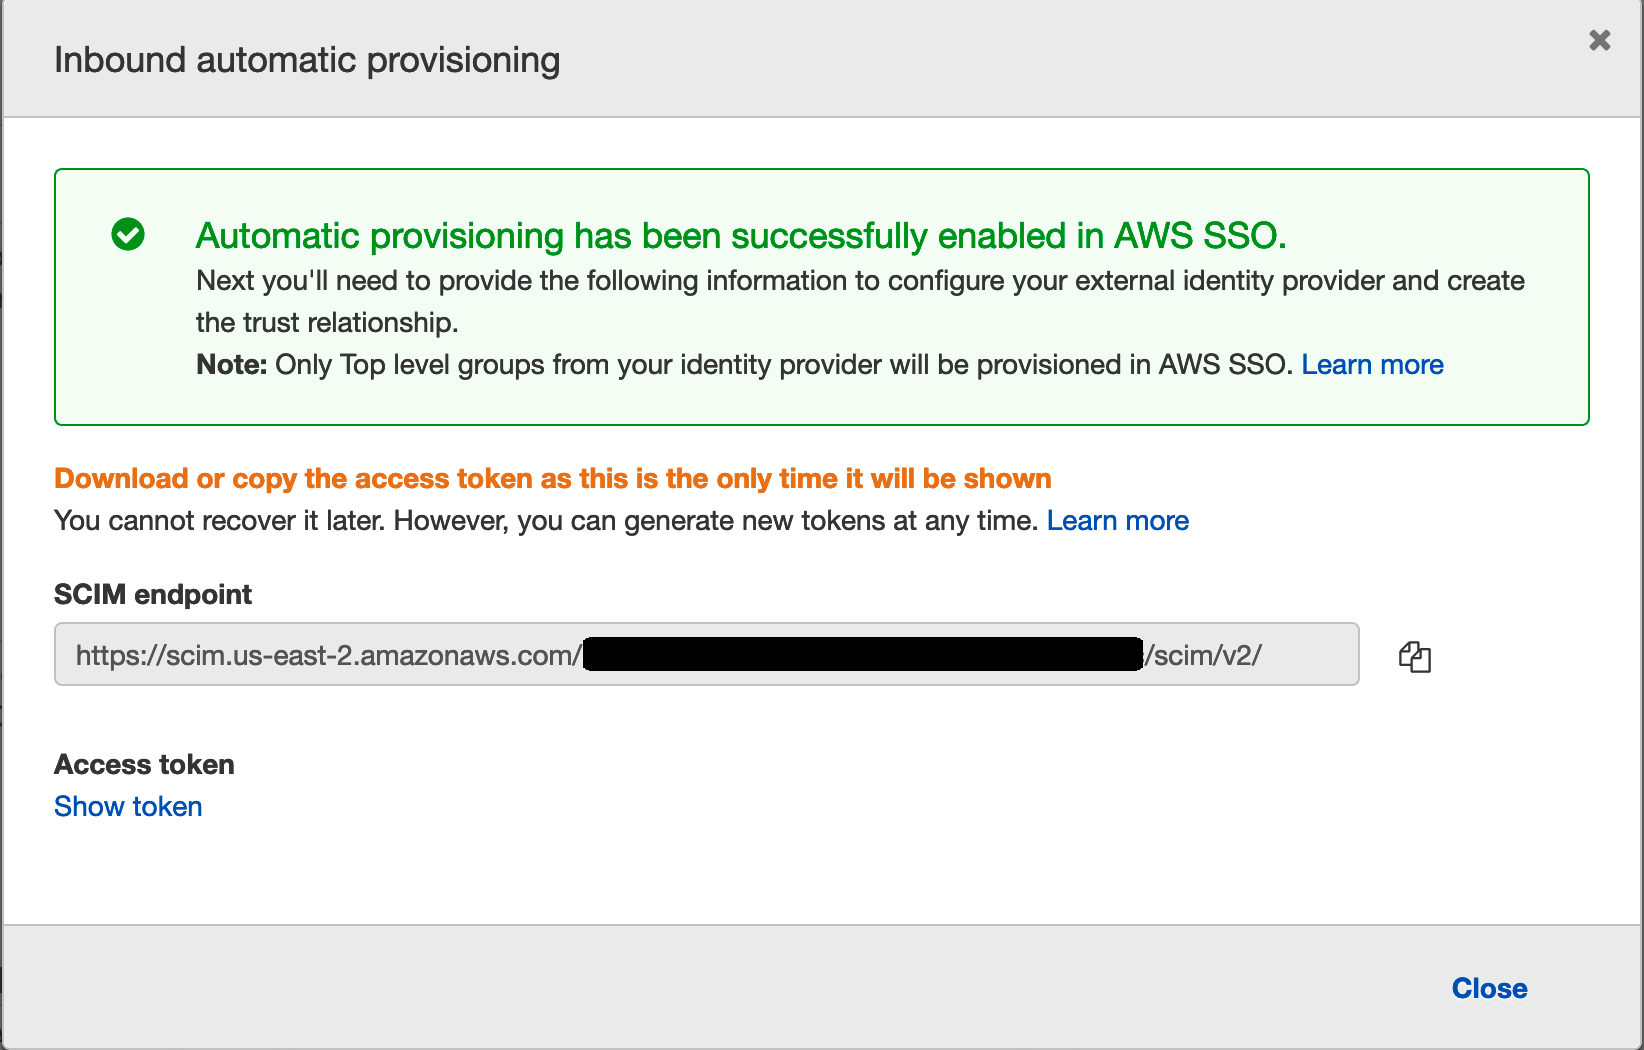
Create a file in the same folder where you have the other artefacts, and call it aws.toml (you can call this whatever you want, you will refer to the file as a parameter later). The file will be in the format of two lines:
Token = "bea11536........=="
Endpoint = "https://scim.us-east-2.amazonaws.com/...../scim/v2/"
Every time you update or change this setting, these values will change so bear that in mind if you are automating this and need to update these settings.
Note! You will to reset this file on a regular basis to ensure good security hygiene. You can delete or generate new tokens as and when you need to, so make sure you bake this into how you deploy this tool.
It is important to know that this process is just performing a one way synchronisation from the G-Suite directory to AWS SSO, but it is NOT enabling any of those identities to access AWS…yet. You still need to do that.
You can assign users and group to a set of AWS Permissions, and once you have done that they will then be able to access AWS resources. Try and use groups to manage these rather than assigning permission sets to individuals.
Running SSOSync
Note! Running SSOsync will delete any existing users and group you have defined in your AWS SSO, so do NOT proceed unless you understand that.
Once you have all these files in place, kick off your sync process by running
$ ./ssosync
And you should see output as it starts syncing users and groups, and removing any current users and groups in your AWS SSO setup.
2020-05-26T15:23:39.023+0100	INFO	cmd/root.go:43	Creating the Google and AWS Clients needed
2020-05-26T15:23:39.025+0100	INFO	internal/sync.go:38	Start user sync
2020-05-26T15:23:42.453+0100	INFO	internal/sync.go:60	Create user in AWS	{"email": "albert.camus@beachxxxx.co.uk"}
2020-05-26T15:23:42.804+0100	INFO	internal/sync.go:60	Create user in AWS	{"email": "che@beachxxxx.co.uk"}
2020-05-26T15:23:43.028+0100	INFO	internal/sync.go:60	Create user in AWS	{"email": "poet@beachxxxx.co.uk"}
2020-05-26T15:23:43.306+0100	INFO	internal/sync.go:60	Create user in AWS	{"email": "ricardo.sueiras@beachxxxx.co.uk"}
2020-05-26T15:23:43.656+0100	INFO	internal/sync.go:73	Clean up AWS Users
2020-05-26T15:23:43.657+0100	INFO	internal/sync.go:76	Delete User in AWS	{"email": "developer1"}
2020-05-26T15:23:44.378+0100	INFO	internal/sync.go:89	Start group sync
2020-05-26T15:23:45.214+0100	INFO	internal/sync.go:119	Creating group in AWS	{"group": "Admin Group"}
2020-05-26T15:23:46.232+0100	INFO	internal/sync.go:135	Start group user sync	{"group": "Admin Group"}
2020-05-26T15:23:46.807+0100	INFO	internal/sync.go:154	Adding user to group	{"group": "Admin Group", "user": "che@beachxxxx.co.uk"}
2020-05-26T15:23:47.729+0100	INFO	internal/sync.go:154	Adding user to group	{"group": "Admin Group", "user": "ricardo.sueiras@beachxxxx.co.uk"}
2020-05-26T15:23:48.027+0100	INFO	internal/sync.go:119	Creating group in AWS	{"group": "Beats Group"}
2020-05-26T15:23:49.199+0100	INFO	internal/sync.go:135	Start group user sync	{"group": "Beats Group"}
2020-05-26T15:23:50.188+0100	INFO	internal/sync.go:154	Adding user to group	{"group": "Beats Group", "user": "albert.camus@beachxxxx.co.uk"}
2020-05-26T15:23:51.440+0100	INFO	internal/sync.go:119	Creating group in AWS	{"group": "Poets"}
2020-05-26T15:23:52.119+0100	INFO	internal/sync.go:135	Start group user sync	{"group": "Poets"}
2020-05-26T15:23:52.982+0100	INFO	internal/sync.go:154	Adding user to group	{"group": "Poets", "user": "ricardo.sueiras@beachxxxx.co.uk"}
2020-05-26T15:23:54.797+0100	INFO	internal/sync.go:154	Adding user to group	{"group": "Poets", "user": "poet@beachxxxx.co.uk"}
2020-05-26T15:23:55.050+0100	INFO	internal/sync.go:172	Clean up AWS groups
2020-05-26T15:23:55.050+0100	INFO	internal/sync.go:175	Delete User in AWS	{"group": "DevFam"}
2020-05-26T15:23:55.401+0100	INFO	internal/sync.go:183	Done sync groups
You have now synced from your G-Suite directory to your AWS SSO users and groups. When you go back to the AWS console, we can see our users and groups are there, and all we now need to do is assign them AWS resources.
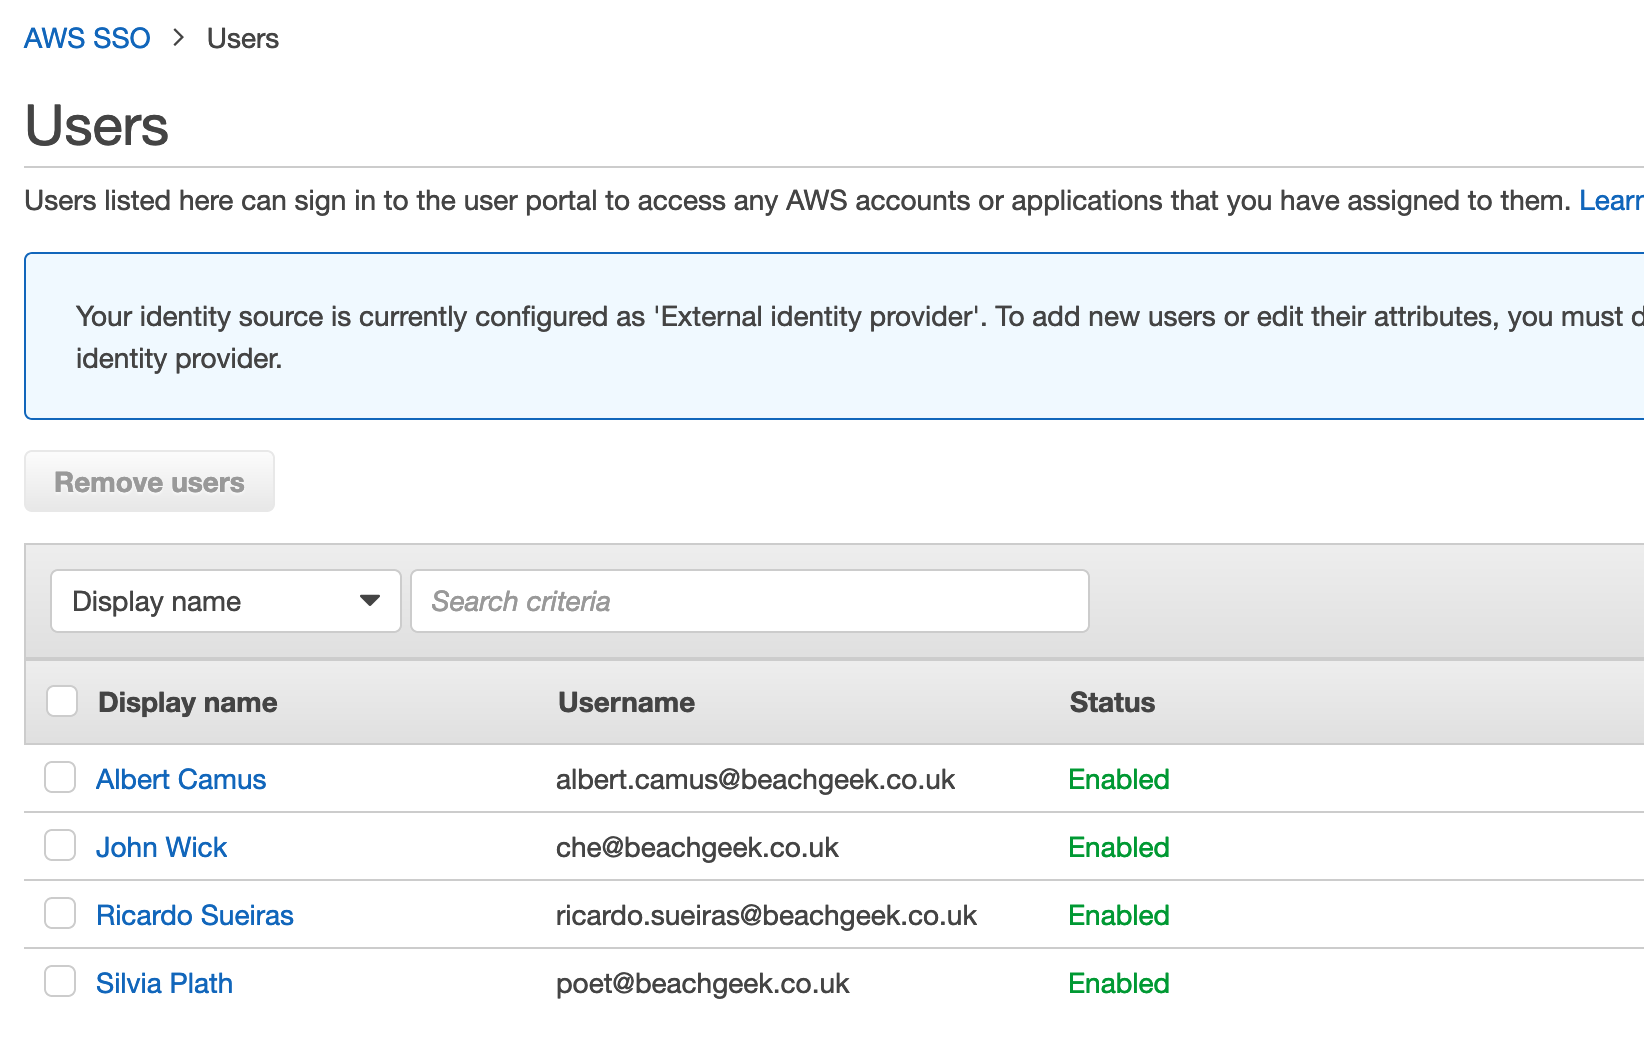
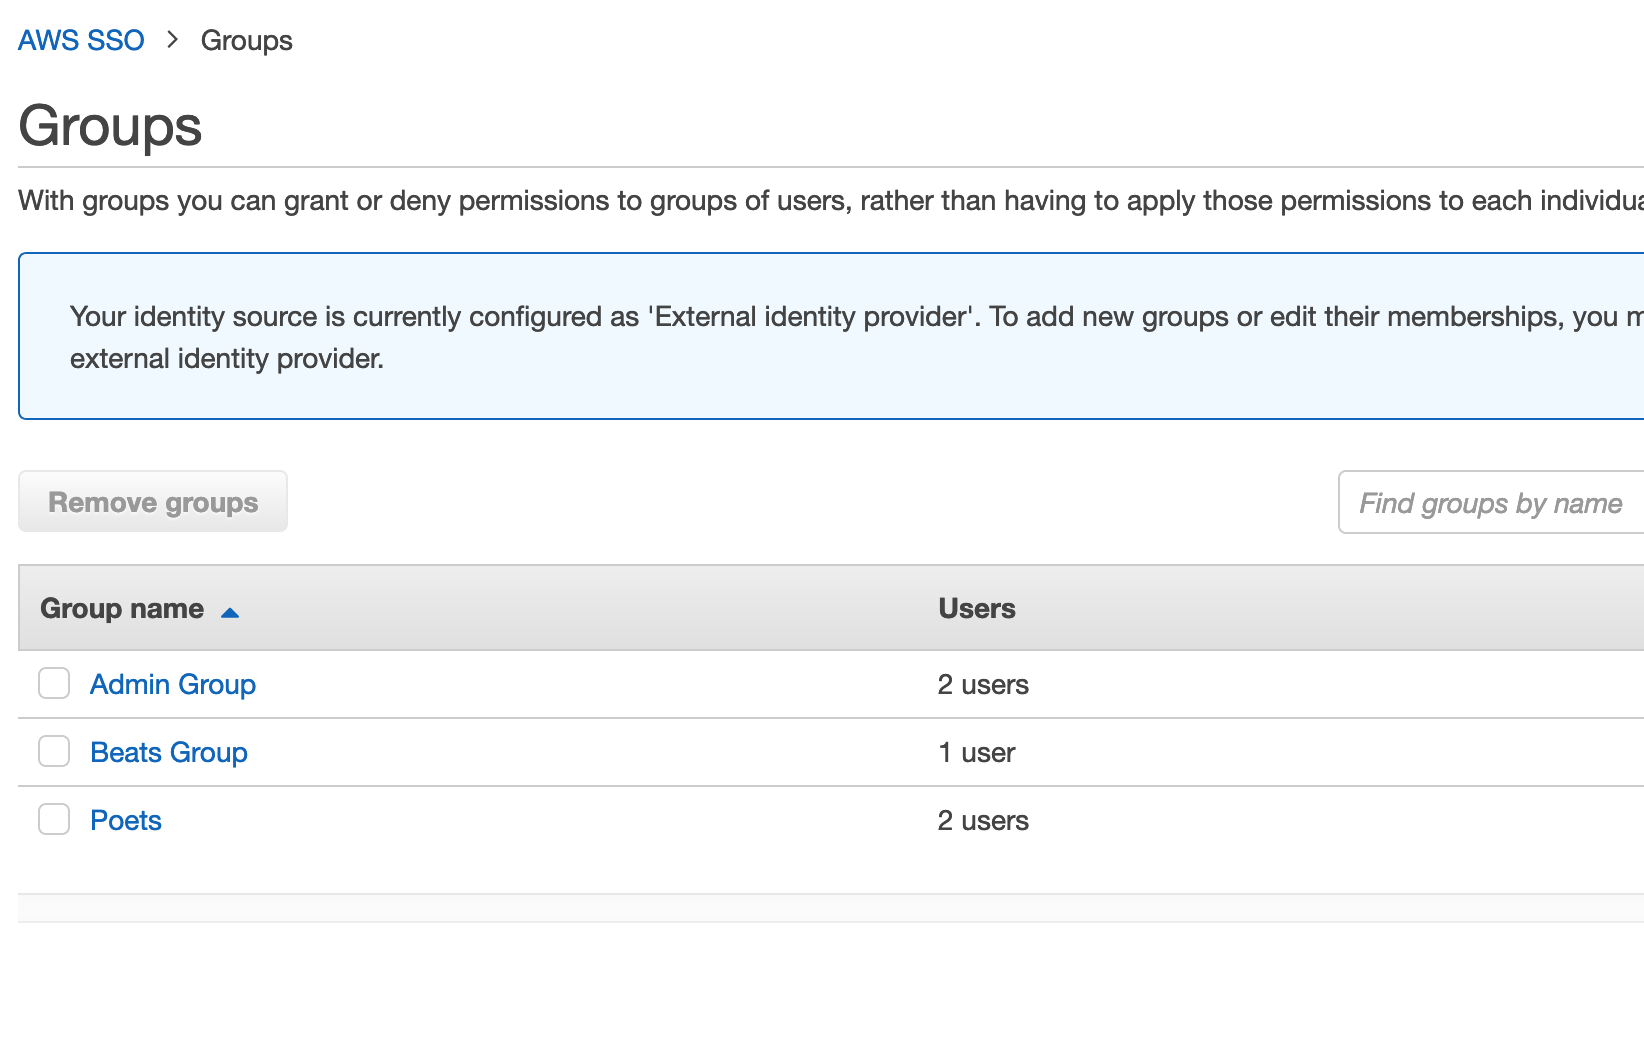
If we re-run the tool, having made no changes to users or groups we will see no updates.
2020-05-26T15:34:20.789+0100	INFO	cmd/root.go:43	Creating the Google and AWS Clients needed
2020-05-26T15:34:20.791+0100	INFO	internal/sync.go:38	Start user sync
2020-05-26T15:34:24.278+0100	INFO	internal/sync.go:73	Clean up AWS Users
2020-05-26T15:34:24.278+0100	INFO	internal/sync.go:89	Start group sync
2020-05-26T15:34:25.629+0100	INFO	internal/sync.go:135	Start group user sync	{"group": "Admin Group"}
2020-05-26T15:34:28.328+0100	INFO	internal/sync.go:135	Start group user sync	{"group": "Beats Group"}
2020-05-26T15:34:29.479+0100	INFO	internal/sync.go:135	Start group user sync	{"group": "Poets"}
2020-05-26T15:34:30.472+0100	INFO	internal/sync.go:172	Clean up AWS groups
2020-05-26T15:34:30.472+0100	INFO	internal/sync.go:183	Done sync groups
What next
This post has show you how to get the ssosync open source tool to help you synchronise your G-Suite directory with your AWS Sign Sign on environment.
If this is useful, then you will probably need to think about:
- How to automate the running of this on a regular basis
- How you approach managing the security sensitive artefacts that are generated
- How you cycle and reset credentials on a regular basis
Thanks!
Many thanks to Lee Packham for the work that has gone into this open source tool. You can find the GitHub repository for ssosync here.
