Integrating Keycloak as my Identity Provider for IAM Identity Centre: Part two, configuring Keycloak as my Identity provider
Published Jun 12, 2023
Reading time 5 minutes
This is the follow up post to Integrating Keycloak as my Identity Provider for IAM Identity Centre: Part one, deploying Keycloak on AWS, where I looked at how to deploy Keycloak on AWS in order to have an Identity Provider to use when configuring AWS Identity Centre. In this post, I am going to use that setup, and show you how I configured it to integrate with AWS Identity Centre to provide access to my AWS resources.
AWS Identity Centre is the new name for AWS Single Sign On
In this walkthrough I have a test user (“developer@bigdev.com”) which I have configured in Keycloak. Typically this might be any user that Keycloak is managing (it supports a broad range of federated identity stores) but I am keeping it simple for this walk through. I want to be able to use this user account to log into my AWS account.
Let’s see how we do this.
Pre-reqs
In order to find this post useful, you will need a Keycloak server up and running. If you do not have this, then you could try out my previous post Integrating Keycloak as my Identity Provider for IAM Identity Centre: Part one, deploying Keycloak on AWS. Aside from a running Keycloak server, you will need:
- Admin access to your AWS Account where you want to integrate Keycloak as your Idp
- I have setup a test user and group in AWS IAM Identity Centre which maps to the external user in Keycloak
Users and Groups in AWS IAM Identity Centre Not in scope for this post, but within AWS IAM Identity Centre you are able to define groups and permissions sets, and then assign these to users that are created. When you integrate an Idp with AWS IAM Identity Centre, this is your control point to ensure you define and control what these federated users have permissions to do.
In this walkthrough I created the simplest setup. A group called “Dev-Users” which have a subset of AWS permissions (in my case, PowerUsers who can do a lot but not everything) and assigned a user called “developer@bigdev.com” which I have created in my Keycloak environment. I can log into Keycloak as “developer@bigdev.com” but this account currently cannot log into my AWS account.
Starting off at the AWS IAM Identity Centre
From IAM Identity Centre, I click on STEP 1: Choose your Identity Source.
From the first option that comes up, I select External Identity Provider
I then DOWNLOAD the metadata file under the Service Provider Metadata section. I will need this in the next section.
Switching to Keycloak Administrator
I now switch to Keycloak, logging in as my admin user.
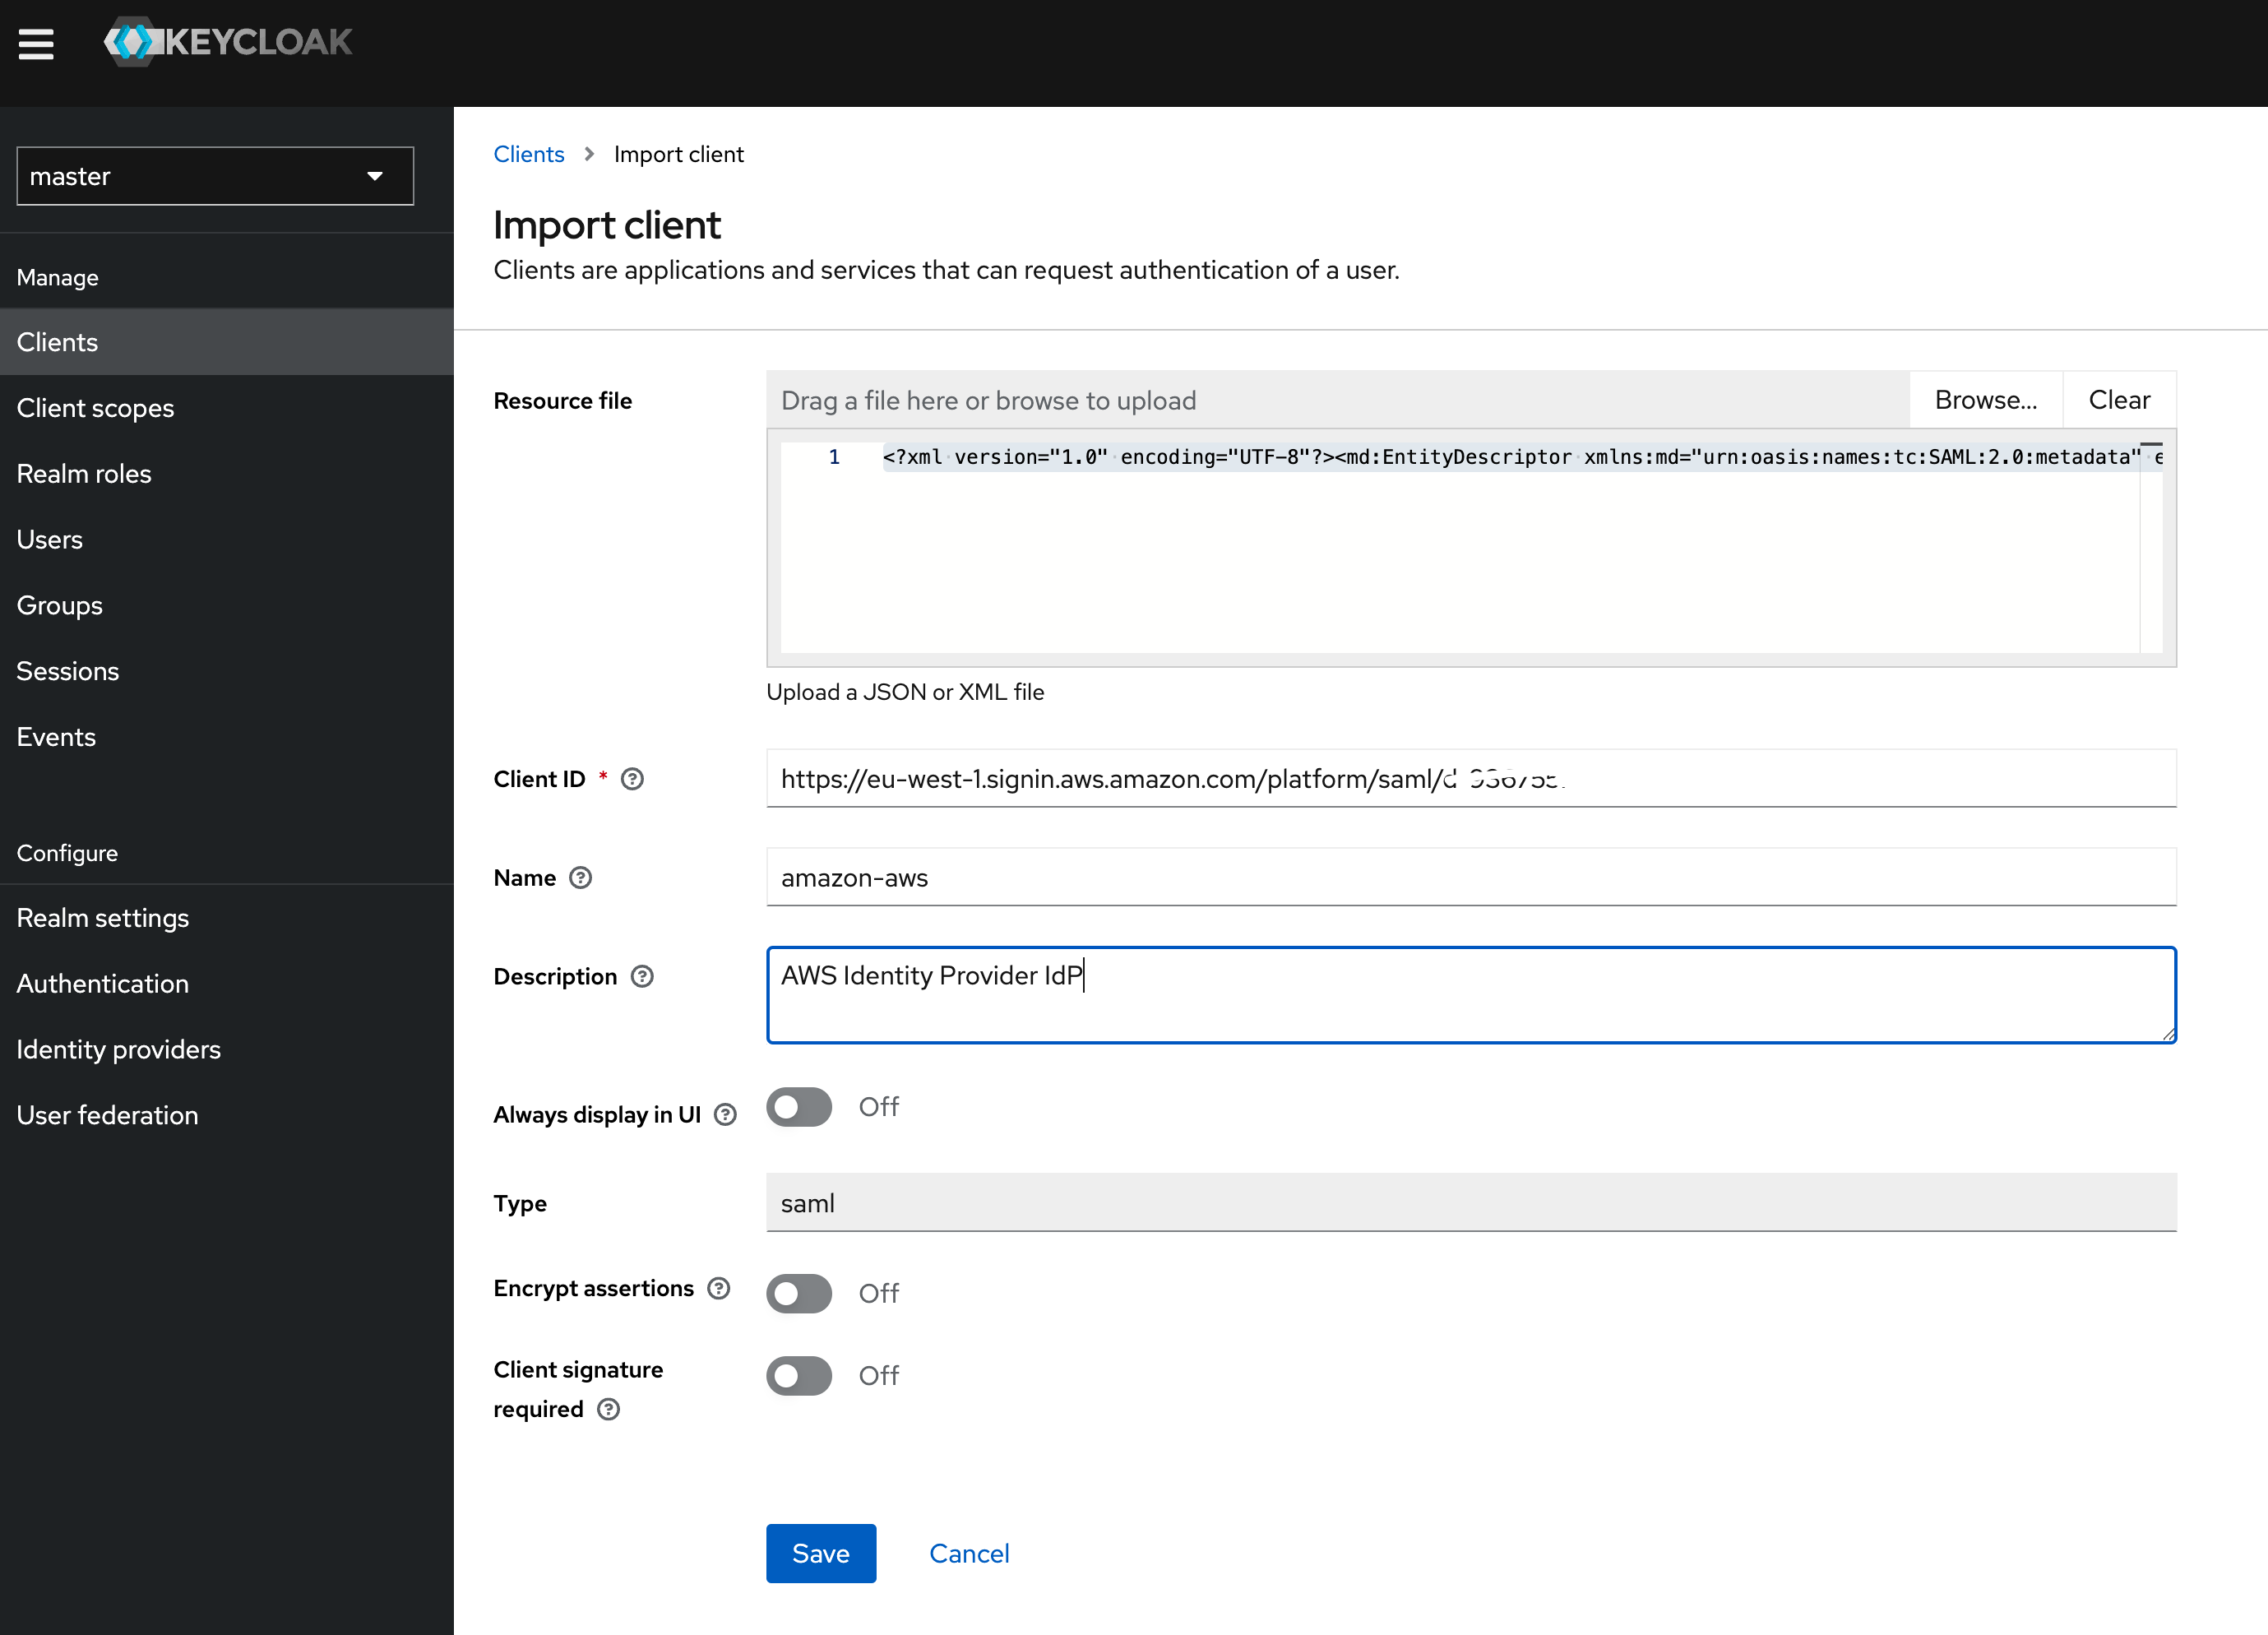
From the Clients menu option on the left, I click on IMPORT CLIENT. From the screen that appears, I use the BROWSE button to select the metadata file I download from the AWS Service Provider Metadata section.

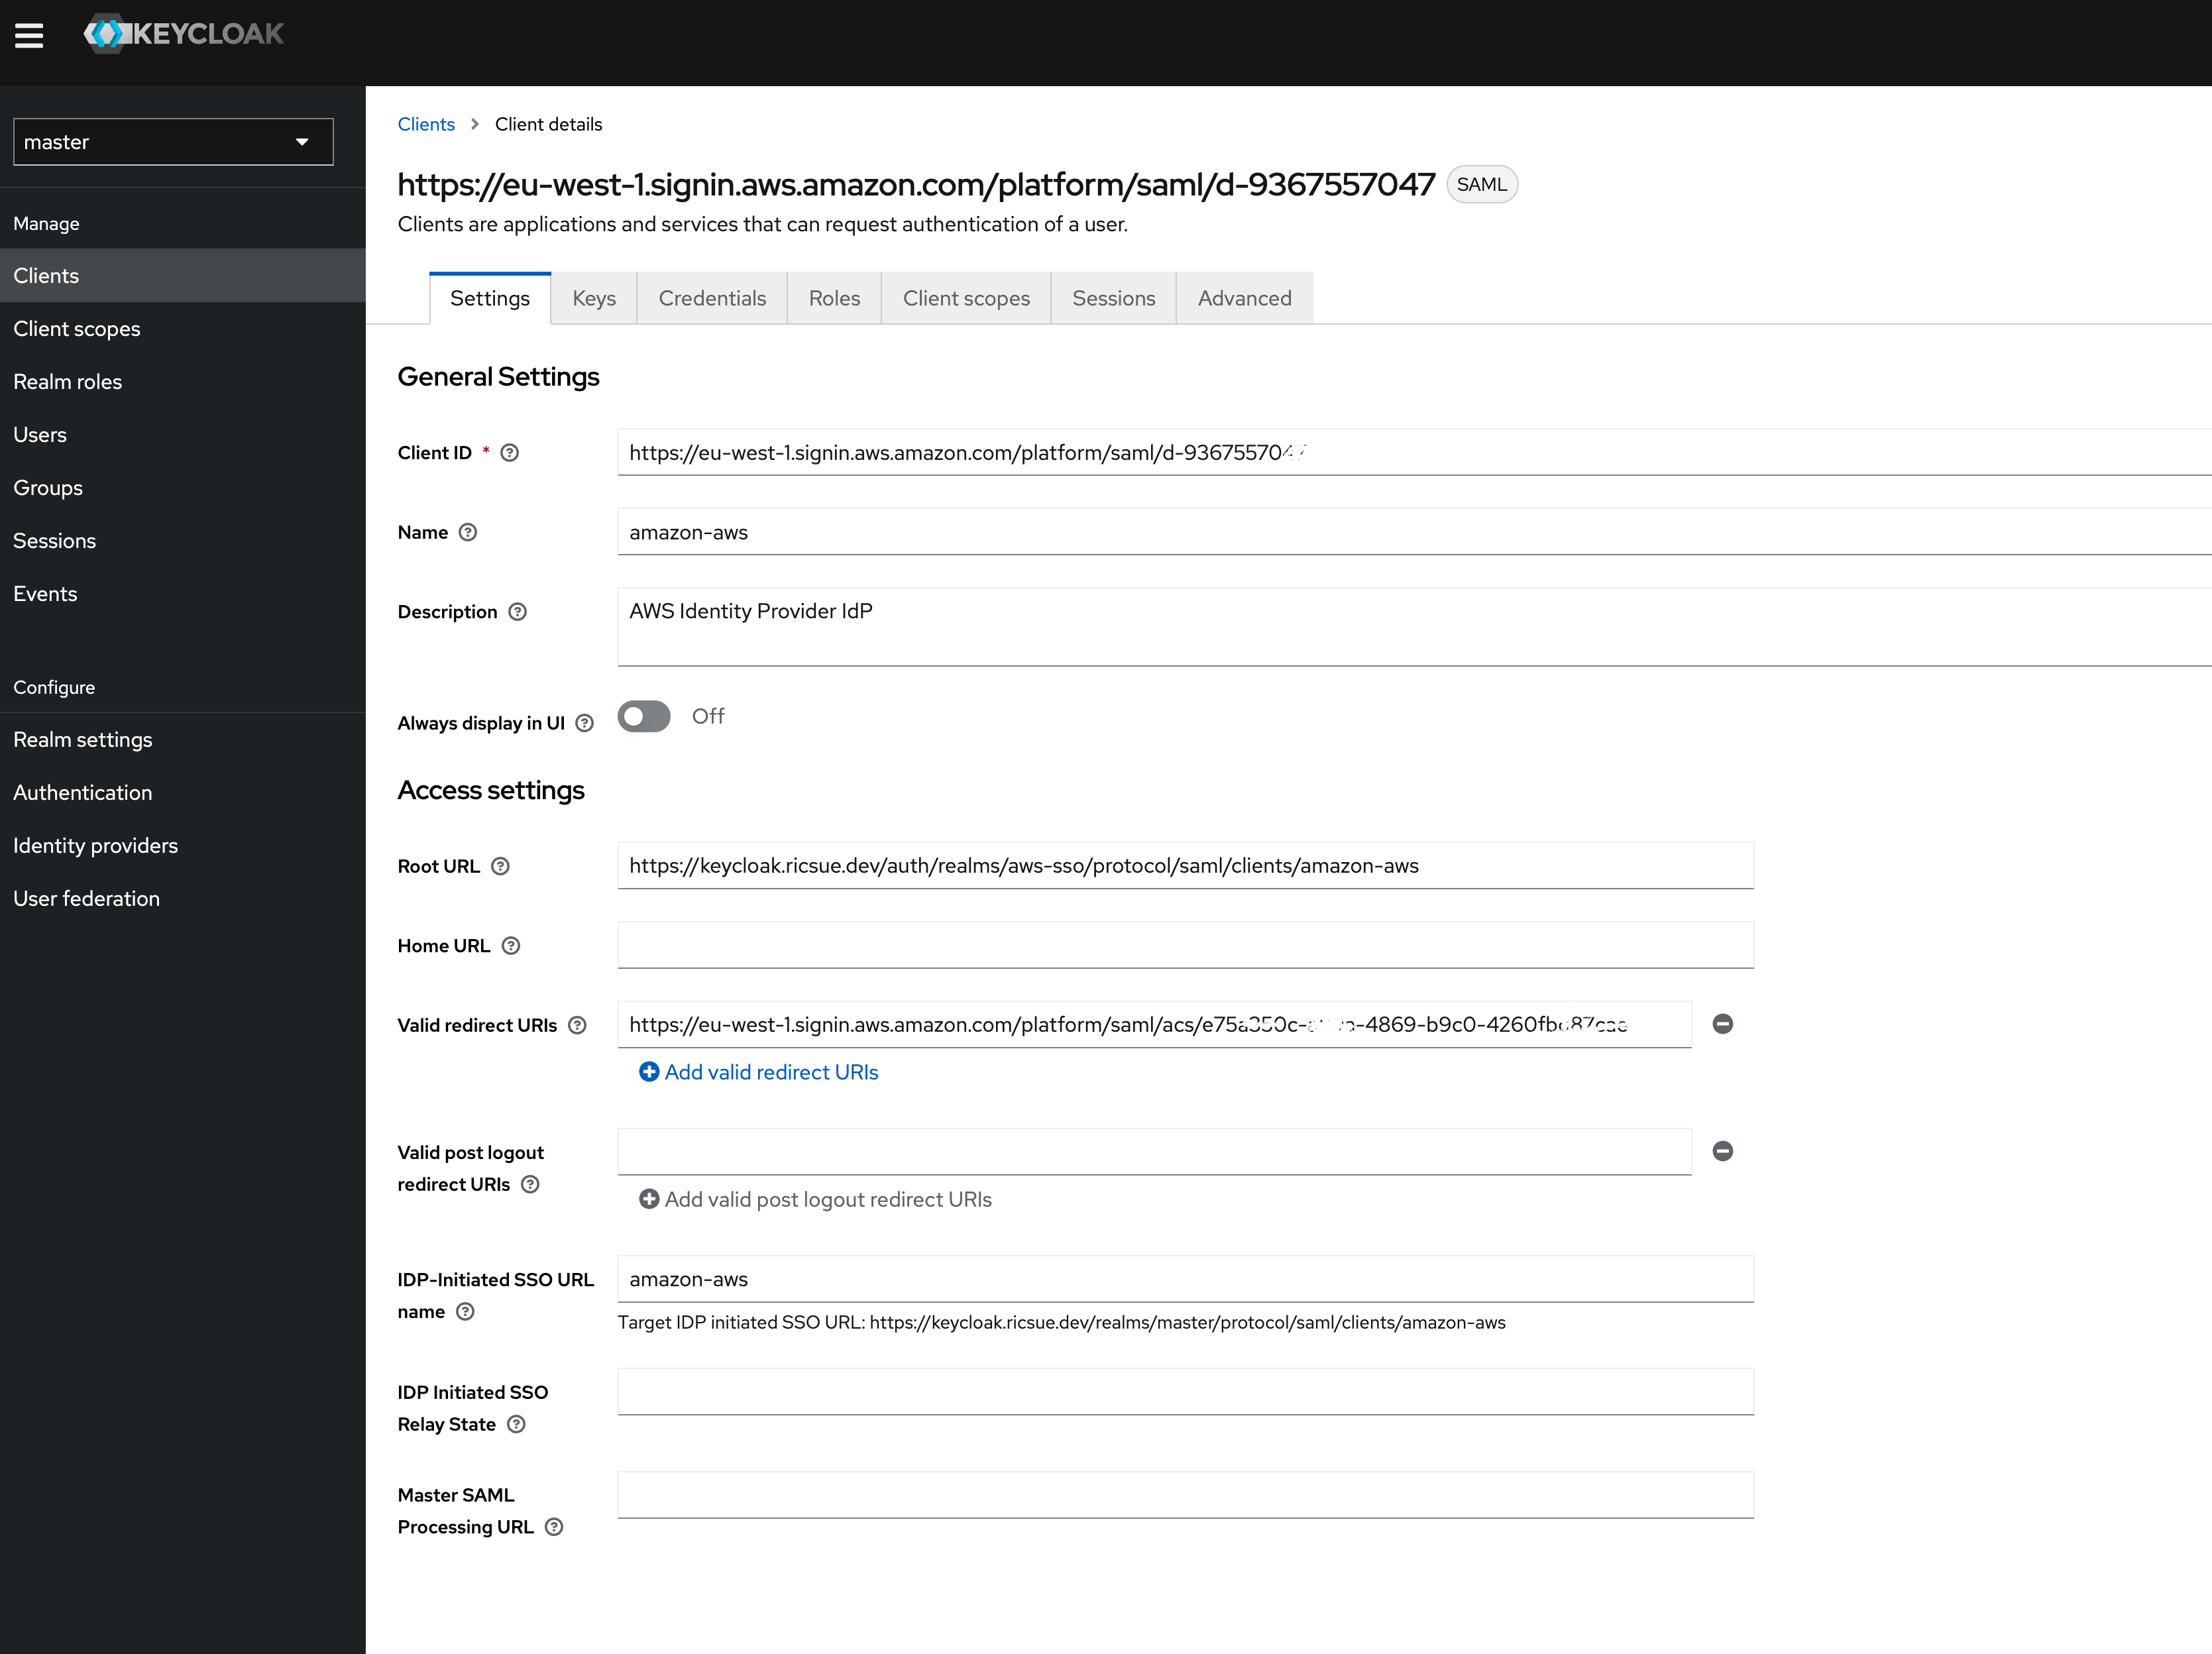
This should popular the CLIENT-ID field. Click on SAVE which will now present a more comprehensive set of configuration settings that you can change.
There are a few options we need to add:
- NAME - I set this to “amazon-aws”
- ROOT URL - As I am using a fresh, vanilla installation of Keycloak, I used the default Realm. This means that I needed to set this option to “https://keycloak.ricsue.dev/auth/realms/master/protocol/saml/clients/amazon-aws" - if you change your Realm, then update the “master” to whatever your Realm is called.
- IDP Initiated SSO URL Name - is set to “amazon-aws”

Note! The settings I have used are only illustrative for the purpose of this blog post and showing you have to get this running. You should absolutely take care in setting these options and understand what they mean to ensure that what you get is what you expect.
Go to REALM SETTINGS from Keycloak’s main menu, and under the GENERAL tab, right click and save the SAML2.0 IDENTITY PROVIDER METADATA information. I saved this as “provider-idp-metadata.xml”.
Back to AWS IAM Identity Centre
Back to the AWS IAM Identity Centre, still at the “Configure external Identity Provider” screen we can now use the “Idp SAML Metadata” button to upload the file we just downloaded (“provider-idp-metadata.xml”). Once completed you can click on NEXT.
You will now be asked to review and then confirm changes by typing into the confirmation box. Review and then if happy, type in ACCEPT and then click on the “CHANGE IDENTITY SOURCE” button.
AWS IAM Identity Centre will now confirm that your provided metatdata file is valid, and the complete the configuration in a few seconds. If all successful, you will be returned back to the AWS IAM Identity Centre console.
Testing the setup
From the AWS IAM Identity Centre Dashboard, I can see my AWS access portal URL which is the link you would share to enable your federated users to log in.
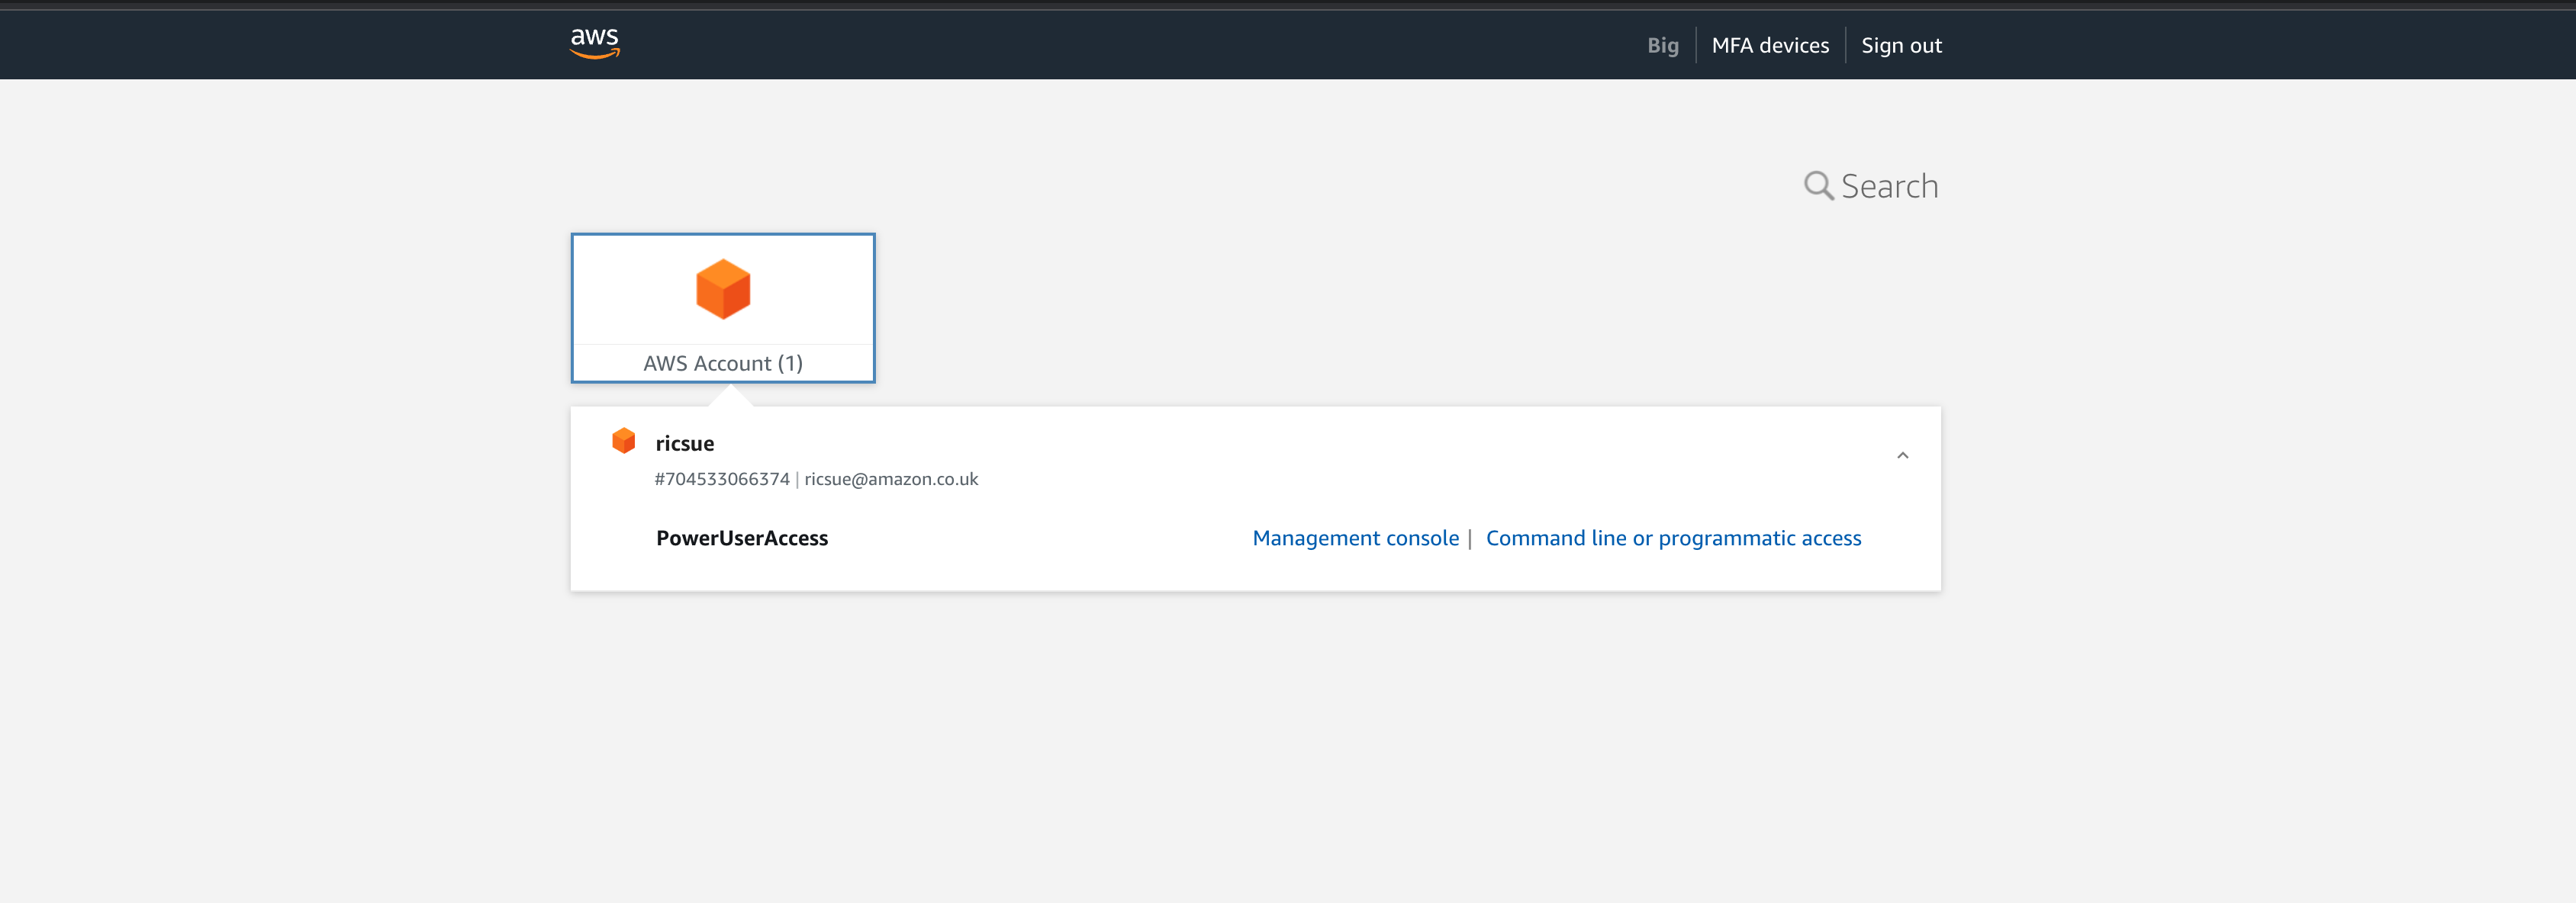
When I click on this, I am redirected to a Keycloak login screen. After entering credentials for my test user (“developer@bigdev.com”) I am taken to the AWS screen that allows me to view and access the various resources I have been assigned. In this case this is just the single AWS account.

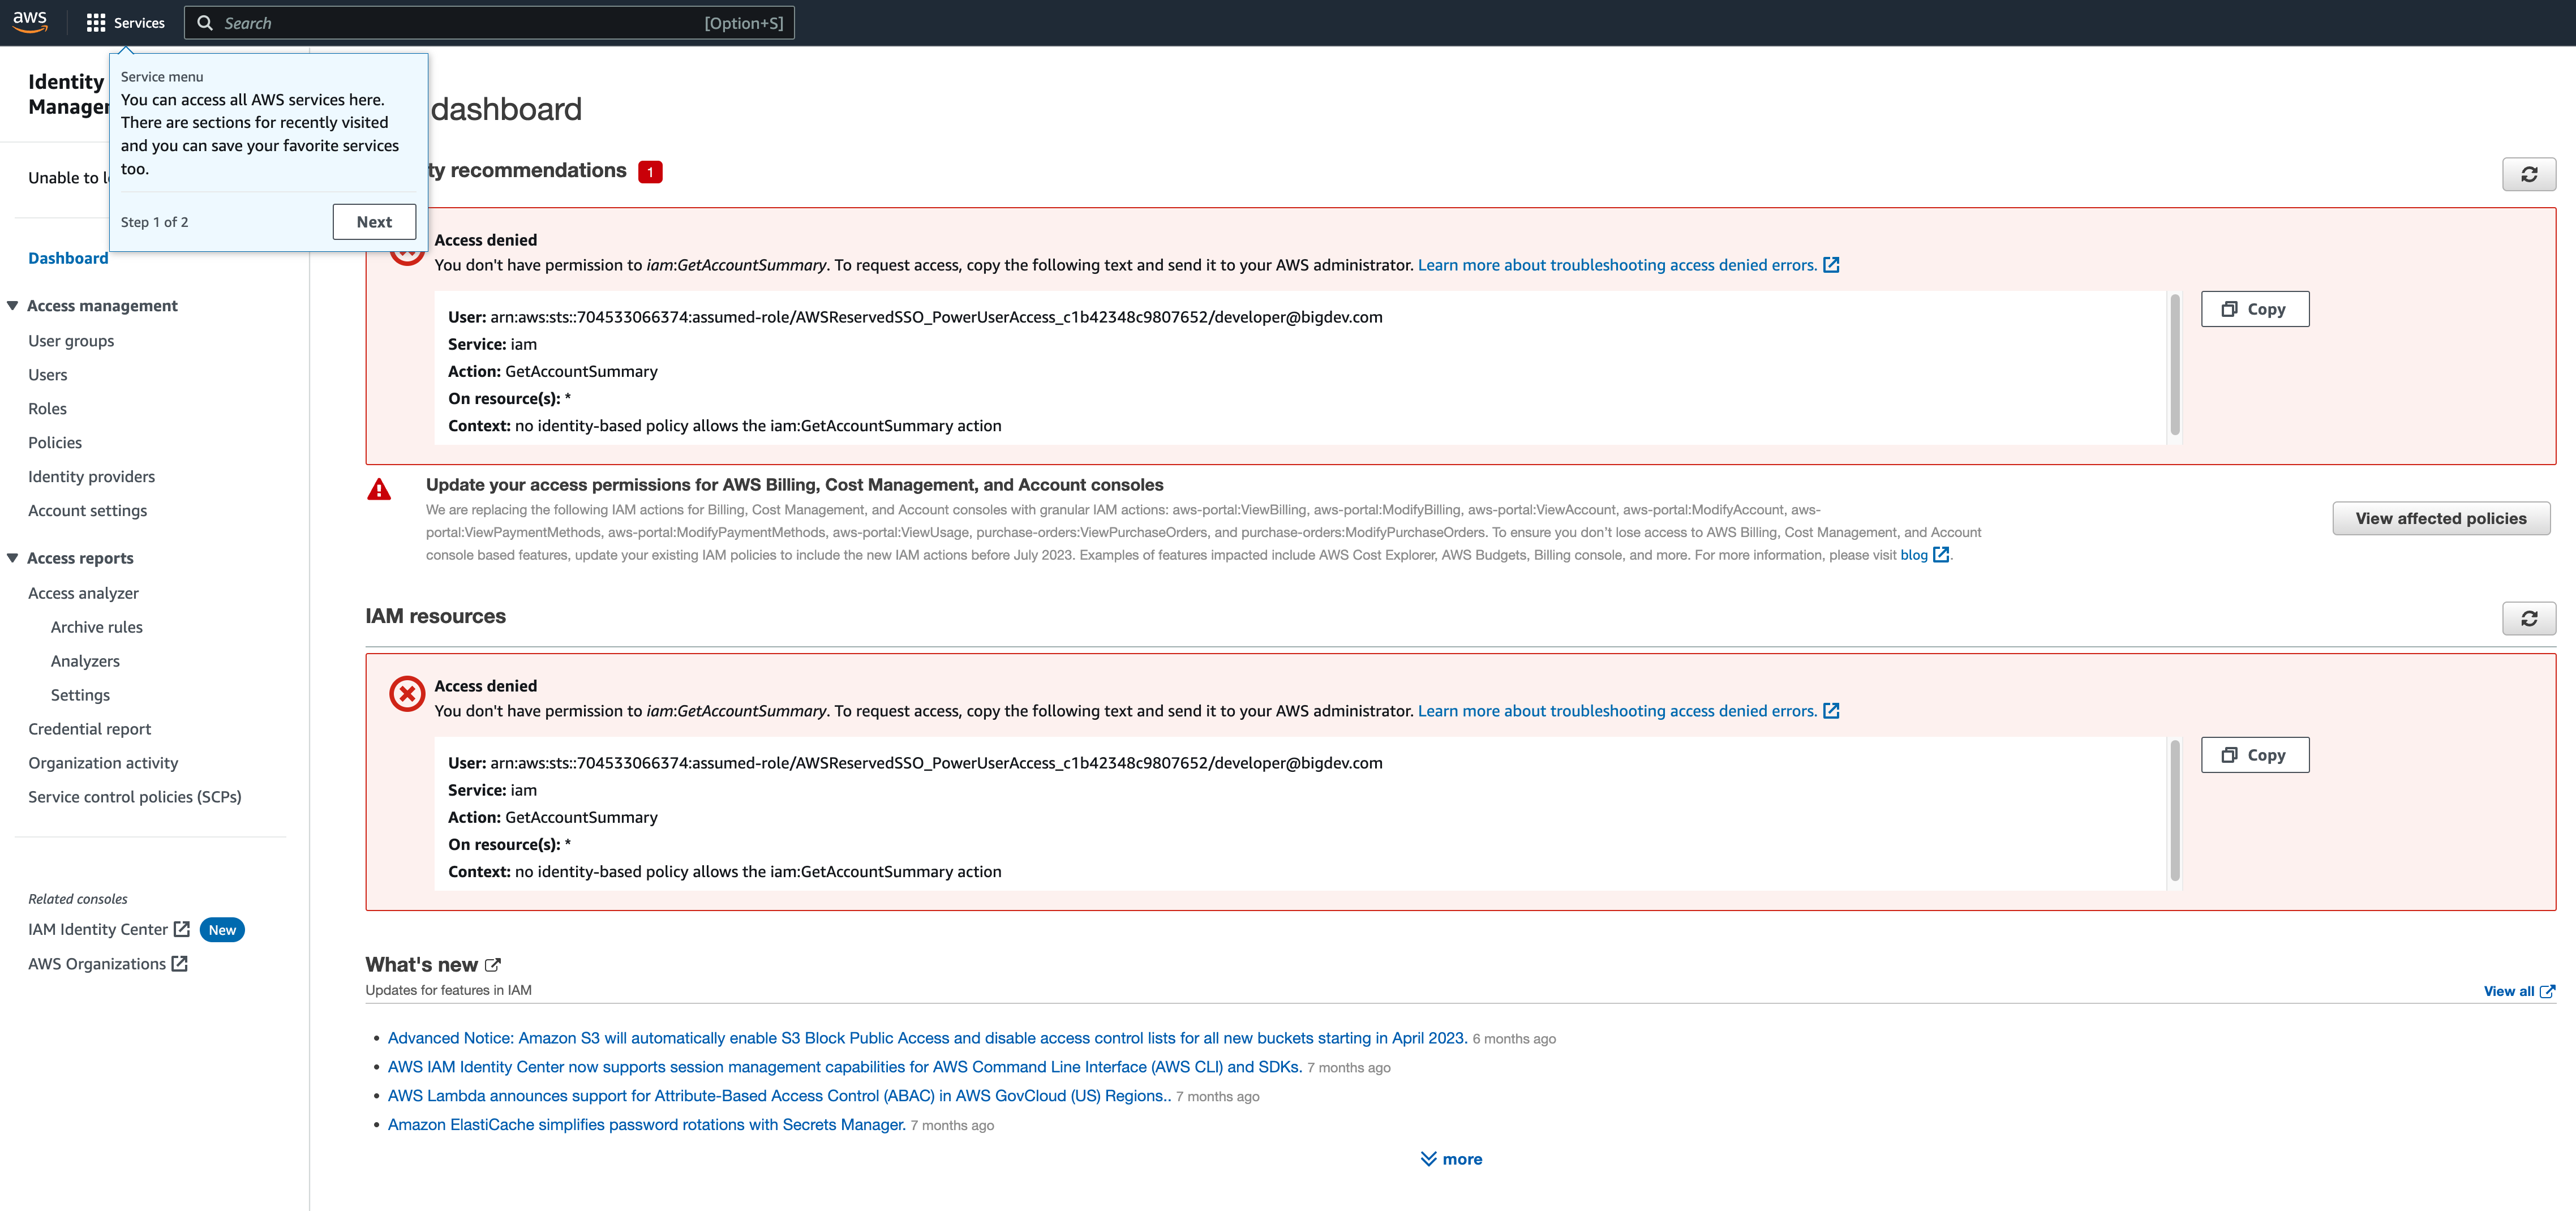
I can access my AWS Account via the console, or via the cli and I am provided with the temporary access tokens to do that. This test user has been assigned the PowerUserAccess set of permissions (which provides a lot of access, but blocks IAM. When I try and view the IAM console, we can see that the privileges this user has been assigned match the PowerUserAccess permissions.

Conclusion
In these two blog posts I showed you how you can deploy Keycloak on AWS, and then integrate it with AWS Identity Centre to provide SSO for your AWS accounts.
One improvement to this setup would be to automate the provisioning of users within AWS IAM Identity Centre from Keycloak. This is typically achieved using System for Cross-domain Identity Management (SCIM) which IAM Identity Center supports. If this is something that interests you let me know and I will add it as a third post to complete the set.
If you have found this blog post helpful, please give me some feedback by completing this very short survey here.
